Rescue systems rarely fail because a single component gives out. They fail at force intersections, the points where loads meet, combine and change direction, and where a system that looked solid on paper starts behaving in ways nobody planned for.
Picture a team that has rigged every piece correctly. The anchor is bombproof, the 3:1 runs clean, the high directional is guyed, and the litter is packaged by the book. Yet once the haul starts, it feels heavier than it should, one guy line goes bar-tight, and the foot of the frame begins to creep. Nothing was rigged wrong. The system simply did what its geometry told it to do, and the team was reading the parts instead of the whole.
In this post we’ll follow force through one complete rope rescue system, from the litter all the way back to the anchor. Along that path are four places where force changes character, and once you learn to recognize them, you’ll start to see every system you build a little differently.
Why isolated skills aren’t enough
Most of us learned rope rescue one module at a time: anchors on one day, mechanical advantage the next, and then directionals, mainlines and litter handling as the course went on. That sequence makes good sense in a classroom, but it doesn’t reflect how force behaves once all those pieces are connected on a real scene.
In an integrated system, force doesn’t just add up neatly from one component to the next. It multiplies through the haul system, redirects at every pulley, and concentrates wherever several loads converge on a single point. Because those effects stack on top of each other, a small change in one place tends to show up somewhere else, usually somewhere you weren’t watching.
That’s the real limitation of analyzing parts in isolation. Every component can sit comfortably inside its rating while the system as a whole drifts toward trouble, and the only way to catch that is to look at how the pieces work together.
One system, traced end to end
The figure below shows a complete system. A litter hangs below an edge from a guyed monopod, which serves as our elevated directional, and the mainline runs over the head pulley and straight back to a 3:1 haul system anchored to a structural column set back from the edge.
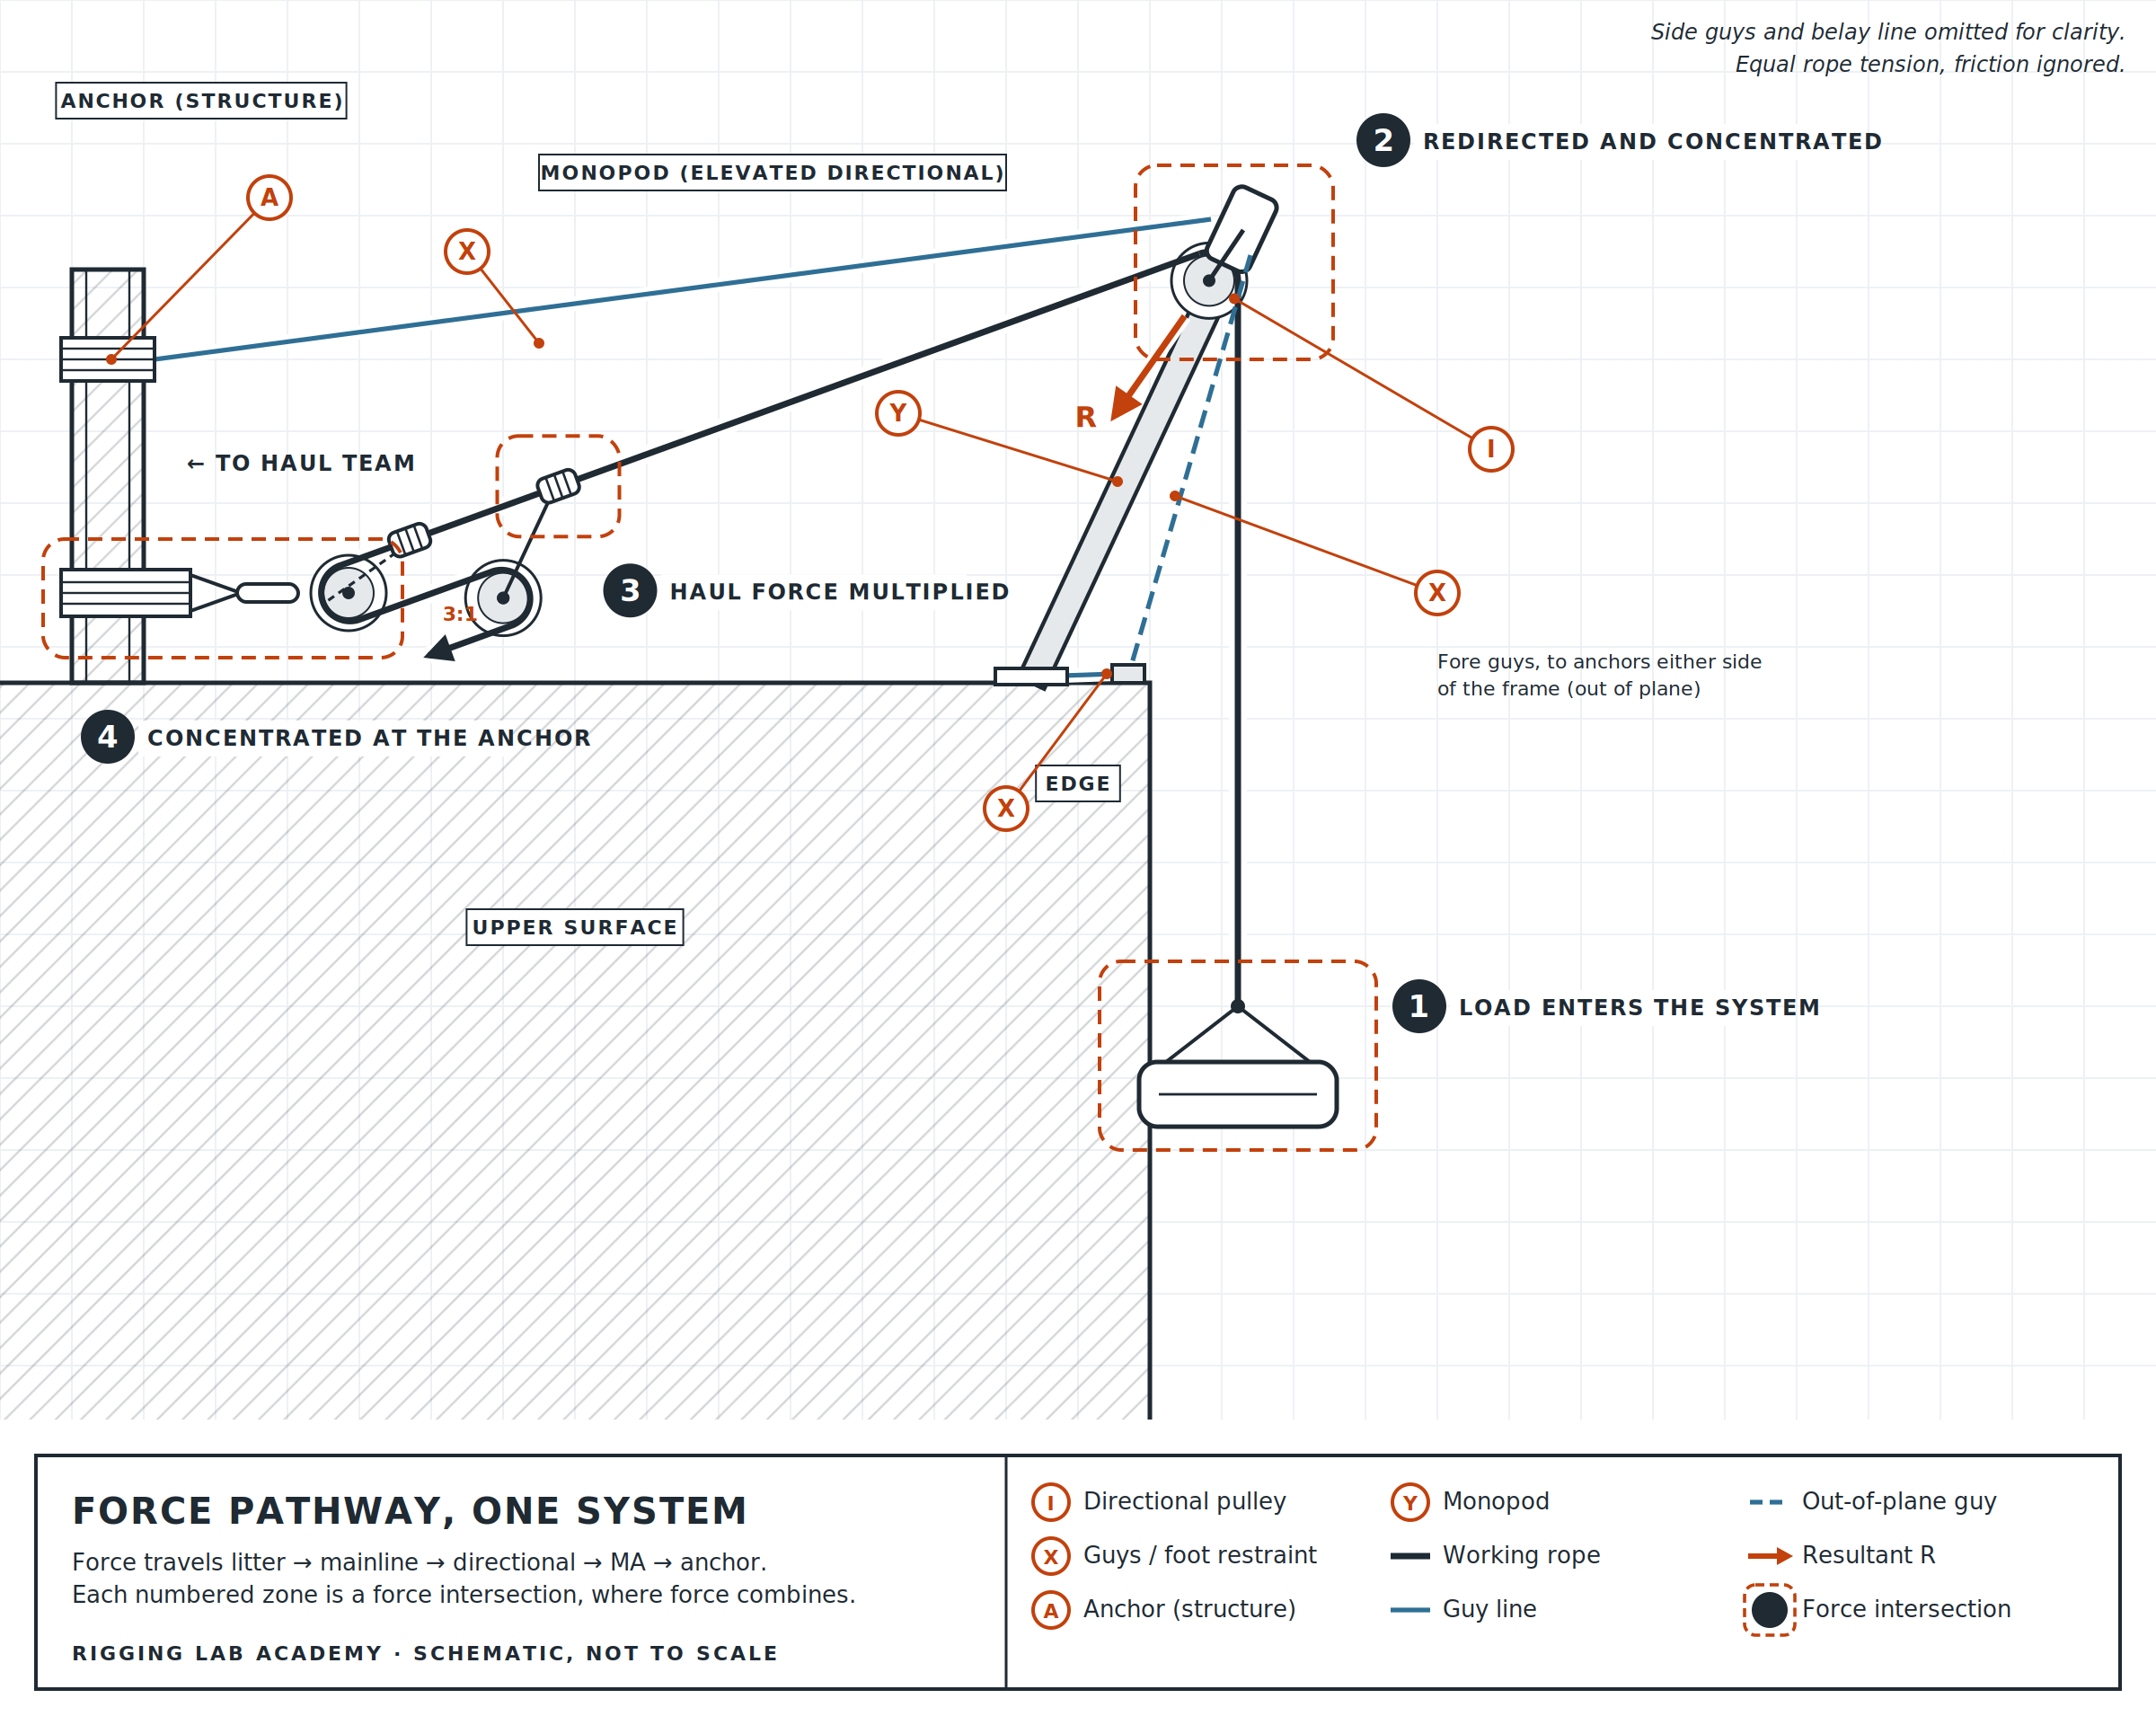
The best way to read it is to start at the litter and follow the mainline back toward the anchor. Each numbered zone marks a force intersection, a point where force changes in size, in direction, or both, and as you reach each one it’s worth pausing to ask what the force is doing there.
Zone 1: Load enters the system
The litter attachment is where the patient’s weight first becomes rope tension, so everything that happens downstream begins at this point.
Start by looking at how the litter hangs. When nothing is pulling it sideways, the bridle and the mainline drop plumb, straight down beneath the directional pulley, and that’s your baseline. If the load leg in your own system is leaning, something is pulling on it from the side, whether that’s a tag line, a second rope, the edge itself or a rescuer working the litter. Whatever the source, that side force is now part of the system, and it changes every force that follows.
Zone 2: Redirected and concentrated
The directional pulley is where force grows larger than the rope that carries it. As the pulley turns the mainline over the edge, the frame has to hold both rope legs at once, with the load leg pulling down toward the litter and the control leg pulling back toward the haul team. The combined pull of those two legs is called the resultant, or R.
It’s easy to assume R equals rope tension, but it doesn’t. In the system shown here, the two rope legs meet at about 70 degrees, which puts R at roughly 1.6 times the tension in either leg, and as the angle between the legs narrows, R climbs closer and closer to double. The same rope and the same load can put far more force on the frame and its guys than most people expect.
R also has a direction, and that direction decides which guys end up doing the work. In this system R falls at a flatter angle than the frame itself, so it pushes the head of the monopod outward and the fore guys take the load. The back guy still has a job to do, but it isn’t where most of the force is going. The foot needs attention too: because the monopod leans out over the edge, its foot is pushed back toward the system, which is why the foot restraint has to pull toward the edge to hold it in place.
The lesson from Zone 2 is that changes at the edge quietly move force onto rigging you may not be watching. Raise or lower the pulley, adjust the frame’s lean, or let the load swing, and R changes in both size and direction.
Zone 3: Haul force multiplied
The rope grab on the mainline is where the haul team’s effort becomes lifting force. A 3:1 multiplies whatever the team puts in, although friction takes its share along the way, and that loss is the part teams most often forget.
When a 3:1 feels much harder to haul than it should, the 3:1 itself is rarely the problem. More often the cause sits upstream, in the redirects, the edge and the directional pulley, each of which takes a piece of the advantage before it ever reaches the load.
It helps to remember that mechanical advantage doesn’t manage force on its own. It adds one more place where force changes, and it ties the haul team directly to everything happening at the edge.
Zone 4: Concentrated at the anchor
The anchor is where everything upstream finally arrives. The 3:1 is built on it, so the mainline tension, the haul team’s effort and the pulley loads all end up on this single point.
That makes the anchor the system’s final answer. Every decision made in Zones 1 through 3, from the way the litter hangs to the way the frame is set to how much friction the haul is fighting, eventually shows up here as load. In this particular system the back guy is tied to the same structure, so the anchor is also carrying part of the directional’s load.
It’s entirely possible to build a strong anchor and still overload it, simply because no one traced what the rest of the system was sending its way.
Thinking in networks, not parts
Once you can see the four zones, a handful of habits follow naturally. The first is to trace force from end to end, starting at the load and following the rope to the anchor before you call a system ready. The second is to predict how a change will spread, so before you move a pulley, add a redirect or shift the load, you ask where that change is going to land.
The third habit is to watch for small decisions with large consequences, since a slightly lower pulley or a narrower rope angle can push a surprising amount of force onto a guy or an anchor. The last is to focus your checks on the intersections, because that’s where systems fail.
None of this is a one-time exercise, because systems keep changing while you work. The load moves, the edge changes and people swap roles, which is why the full study guide pairs force analysis with Dynamic Risk Assessment tools such as GAR and LACES, so the team keeps re-checking a system that never stays still.
Rig the system, not the parts
Mastering complex rescue systems ultimately comes down to one shift in thinking: managing force as a single connected network rather than a collection of separate parts. The litter, the directional, the haul and the anchor aren’t four different problems. They’re one problem with four places to check.
This post walks through just one system. The full study guide, An Integrated Study of Force Management Across Complex Rescue Systems, works through 15 scenario questions covering highlines, piggybacks, high directionals, skate blocks, two-rope offsets, pick-offs and confined-space extractions, and you’ll find it in the Rigging Lab Academy library.
On your next training rig, try this before anyone starts hauling: walk the system from the load back to the anchor, and name each of the four zones out loud as you reach it.