Tips on Using the Figure 8 Descender
The figure 8 descender for rescue rappel is a versatile and widely used device in rappelling and rope rescue operations. It’s simple design allows for smooth and controlled descents, making it a reliable choice for both recreational climbers and rescue professionals. However, using the figure 8 descender effectively requires proper rigging techniques, an understanding of how to stop and lock off during a descent, and the ability to unlock the device when needed.
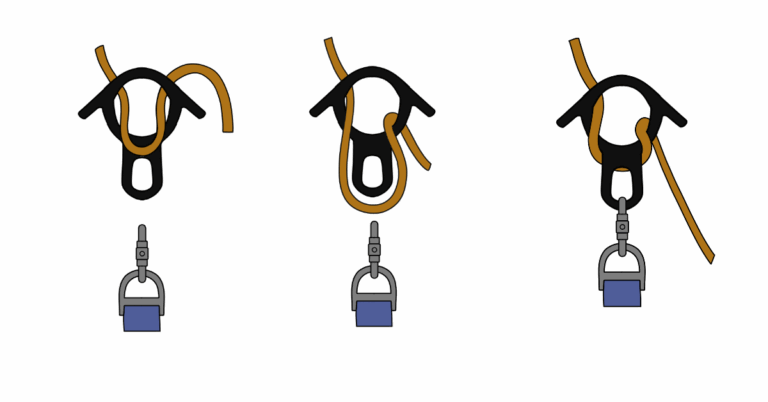
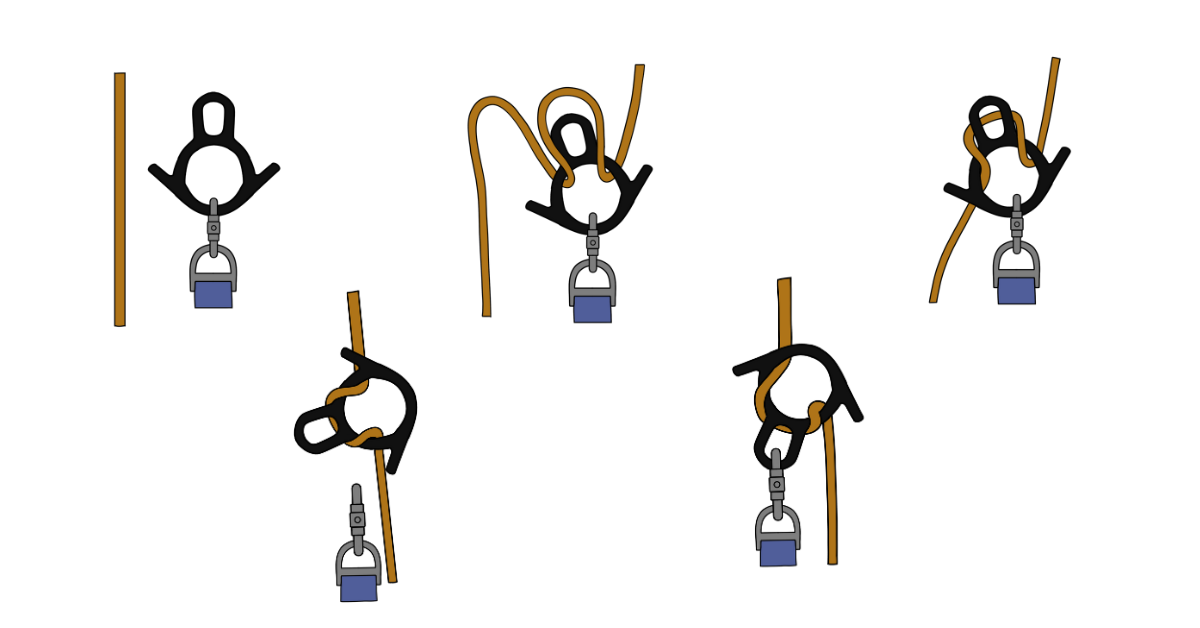
Rigging the Figure 8 Descender
Proper rigging of the figure 8 descender is essential to ensure a safe and controlled rappel. Incorrect rigging can result in loss of control or equipment failure.
Steps to Rig the Figure 8 Descender:
- Inspect the Device:
- Before use, inspect the figure 8 descender for any cracks, deformities, or signs of wear. Ensure that it is in good condition.
- Thread the Rope:
- Pass the rope through the large hole of the figure 8 descender.
- Wrap the rope around the neck of the figure 8, ensuring it follows the correct path to create friction.
- Attach to the Harness:
- Use a locking carabiner to attach the figure 8 descender to your harness’s belay loop.
- Ensure the carabiner is locked and properly secured.
- Check the Setup:
- Perform a system check to verify that the rope is properly threaded and that the figure 8 is securely attached to the harness.
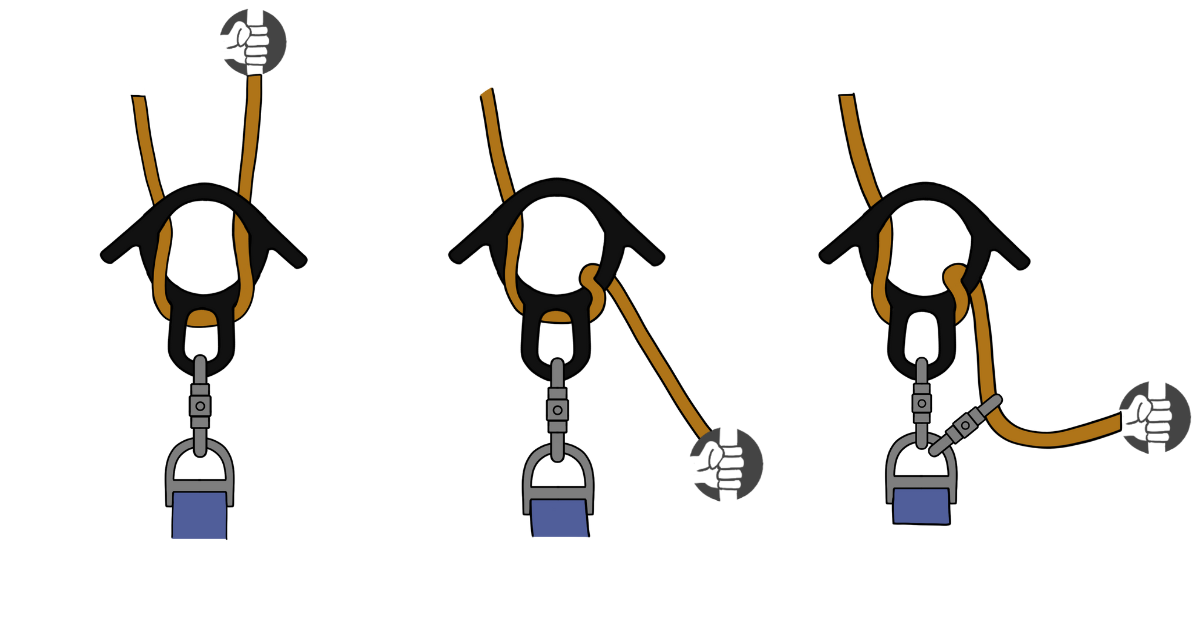
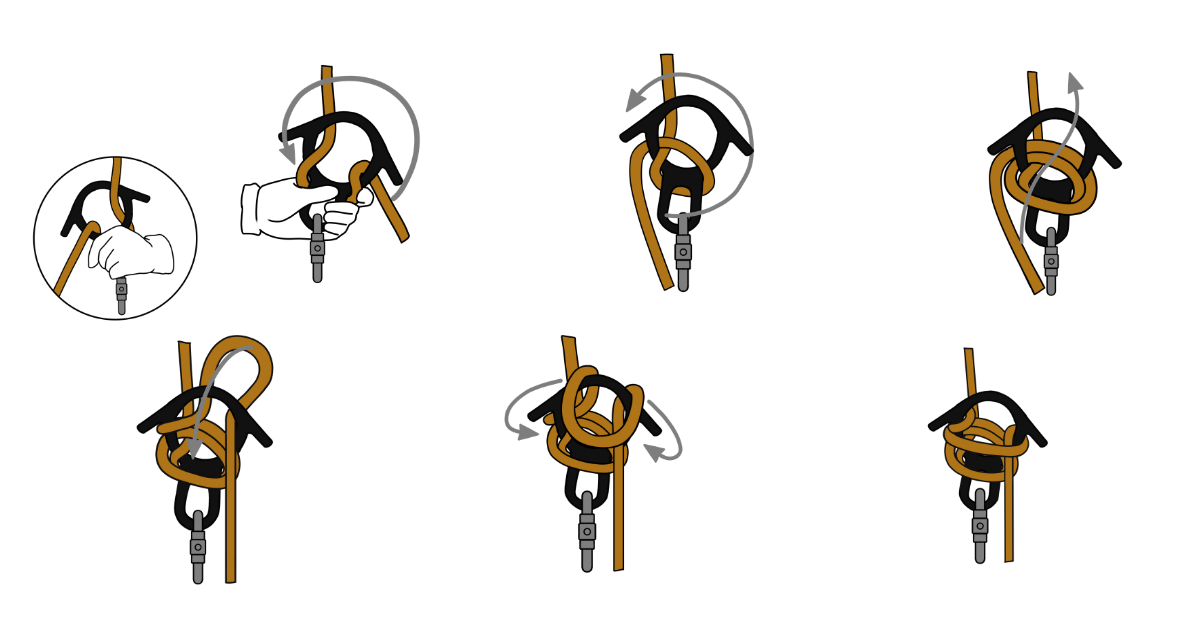
Adding Friction, Stopping and Locking Off with the Figure 8 Descender
During a rappel, it may be necessary to stop and lock off the figure 8 descender to take a break, adjust gear, or handle a situation. Locking off the descender ensures that the rappeler remains securely in place without having to maintain a brake hand grip.
Steps to Lock Off the Figure 8 Descender:
- Stop the Descent:
- Bring your brake hand down and hold the rope firmly to stop your descent.
- Create a Loop:
- Take a bight of the brake rope and bring it up to the large hole of the figure 8 descender.
- Wrap the Loop:
- Wrap the loop over the top of the figure 8 and secure it around the neck.
- Secure the Lock Off:
- Ensure that the loop is tight and that the rope is secure. The tension on the brake rope will keep the figure 8 locked off.
- Double Check:
- Verify that the lock off is secure before letting go of the brake hand.
Situations to Use a Lock Off:
- To take a break during a long rappel
- To free up both hands for gear adjustments
- To manage a rescue scenario or assist another person
 Unlocking the Figure 8 Descender
Unlocking the figure 8 descender after it has been locked off is a crucial skill. The process must be done carefully to avoid sudden or uncontrolled descents.
Steps to Unlock the Figure 8 Descender:
- Reposition Your Brake Hand:
- Place your brake hand firmly on the rope below the figure 8 descender.
- Release the Loop:
- Carefully unwrap the loop from the neck of the figure 8 descender.
- Control the Rope:
- As you release the loop, maintain tension on the brake rope to control the descent.
- Resume the Rappel:
- Once the figure 8 descender is fully unlocked, resume your descent by controlling the rope with your brake hand.
Tips for Unlocking Safely:
- Maintain Control: Always keep your brake hand on the rope to prevent an uncontrolled descent.
- Go Slowly: Release the lock off gradually to ensure a smooth transition back to rappelling.
- Check Your Position: Ensure that you are in a stable position before unlocking the figure 8 descender.
Common Mistakes to Avoid When Using the Figure 8 Descender
- Incorrect Rigging: Always double-check that the rope is properly threaded through the figure 8 descender to ensure it provides the correct amount of friction.
- Removing the Brake Hand: Never remove your brake hand from the rope during a rappel. The brake hand is essential for controlling the descent.
- Rushing the Lock Off Process: Take your time to ensure that the figure 8 descender is securely locked off before releasing your brake hand.
- Failing to Inspect Gear: Regularly inspect the figure 8 descender and associated gear for signs of wear or damage.
Best Practices for Using the Figure 8 Descender
- Practice in a Controlled Environment: Before using the figure 8 descender in a real scenario, practice rigging, locking off, and unlocking in a controlled setting to build confidence.
- Use Proper Rope Management: Ensure that the rope feeds smoothly through the figure 8 descender to prevent tangles or snags.
- Communicate with Your Team: Establish clear communication protocols to ensure everyone is aware of the rappelling progress and any potential hazards.
Conclusion
The figure 8 descender is a reliable and effective tool for rappelling and rope rescue operations. By mastering the techniques of rigging, stopping and locking off, and unlocking the device, rescuers can ensure smooth and controlled descents in a variety of scenarios. Regular practice, proper gear inspection, and adherence to safety protocols are essential for the safe and effective use of the figure 8 descender.
Peace on your Days
Lance