Introduction to Anchors and Anchor Systems
Anchors are the most critical component of any rope rescue system. The entire rescue is in jeopardy if the anchors are not reliable. Anchor systems combine two significant elements:
- Choosing the best anchor (i.e., boulders, vehicles, trees, and bolts), and
- Rigging the anchor
Building an anchor system requires much practice and experience. When dealing with structures, choose anchor points that are part of the inherent construction of the building. This includes columns, beams, anchors for window cleaning equipment, and elevator housings. Avoid corroded metal, weathered stonework, and deteriorated mortar. Avoid using vents, flashing, gutters, and chimneys.
When using a vehicle for an anchor, remove the ignition key, set the brake, and chock the wheels. Do not use the bumper. Connect directly to the vehicle frame using such items as the axle, cross member, or tow hooks.
Often a desirable anchor is off to the side of a needed direction of pull. Ideally, they should be directly above and close to the fall line. When this is not possible (which seems to be more times than not), advanced anchor rigging skills come into play, namely, focusing the direction of the main anchor to a viable position.
Opening Thoughts and Rules
- Make sure the focus of all anchoring systems and points is in complete alignment with the given applied force in action. All vectors include magnitude and direction, but these orientations or forces will be different throughout the system. We’ll be touching on these aspects of understanding, but a notice, not all anchor systems are not created equally and can vary widely.
- Appropriate distribution of force is crucial to engineering a well laid out anchor system.
- General Use anchor systems should aim for a standard 20 kN in combined strength. This may nor may not always be applicable nor doable. It is a place to start though. Experience and Knowledge will lead this toward or away from this number.
- Keep carabiner orientation along the spine at all times.
- Pad and or mitigate all questionable edges.
- Keep the working area free of contaminants.
Anchor Terminology
| Anchor | The generic term for the combination of anchor point, rope, web and other gear to which the systems are attached. |
| Anchor Point | The object that the web or rope is tied to or around that makes up the anchor and thus the anchor system. |
| Anchor System | The connection of anchor points together to create a collective arrangement the rescue system itself is attached to. |
| Backed Up | Anchor that has a secondary or independant anchor to which the rope is also attached. |
| BFR | Slang term for an anchor that can hold the entire rescue package. |
| Bombproof | A collective term that states the anchor is “immovable” and will hold the entire package. |
| Contingency Anchor System | A collection of anchor points that incorporates a lowering or raising system into the anchor. |
| Critical Angle | The interior angle formed within two anchor points or more leading to the collection. |
| Load | The generic term for the rescue package inclusive of the attendees. |
| Load Distributing Anchor System | An anchor system that spreads the load among two or more anchor point in roughly equal measure. Often mis-applied with “self equalizing”. |
| Load Sharing Anchor System | An anchor system of two or more anchor point with the length of the legs adjusted to place an acceptable percentage of load on each anchor point. The goal is to lessen the applied force on any given anchor point. |
| Multi Point Anchor | An anchor system. |
| Non Directional | An anchor system or backed up anchor where the load on each anchor point remains roughly the same as the direction of the pull. |
| Pretensioned Front Tie | Used to remove elongation inherent in an extended anchor system. |
| Simple Anchor | An anchor with a single anchor point. |
| Self Equalizing Anchor System | The former term for “load-distributing anchor system”. |
1.2 Simple Anchors
As a set-up for the upcoming lessons and a review from past lessons –
In the context of rope rescue and rigging, a “simple anchor and system” refers to a basic and straightforward setup used to secure a rope or rigging system to a stable and reliable anchor point. The goal of a simple anchor and system is to create a secure attachment point that can safely support the loads and forces encountered during a rescue or rigging operation.
Here are the key components of a simple anchor and system:
- Anchor Point: A simple anchor and system starts with a suitable anchor point, which is a fixed or secure location where the rope or rigging system will be attached. This anchor point must be strong, stable, and capable of withstanding the anticipated forces without compromising safety.
- Attachment Method: The rope or rigging system is securely attached to the anchor point using an appropriate method. This may involve tying a secure knot or hitch directly to the anchor point or using specialized hardware like carabiners or slings to create the attachment.
- Redundancy: While a simple anchor and system is basic, it should still incorporate redundancy to enhance safety. Redundancy involves having a backup attachment or anchor point in case the primary anchor fails. This backup system provides an additional layer of security to prevent accidents in the event of anchor point failure.
- Load Distribution: If the load on the anchor needs to be shared across multiple points for added safety or to prevent damage to the anchor, load distribution techniques may be used. This can involve using load-sharing anchor slings, multi-point anchor systems, or similar methods to evenly distribute the forces.
- Monitoring and Safety Checks: Technicians responsible for the anchor and system should continually monitor it throughout the operation to ensure that it remains secure and that the load does not exceed the anchor’s safe working capacity. Safety checks should be conducted regularly to detect any signs of wear, damage, or degradation in the anchor point or attachment.
- Knots and Hitches: Depending on the situation, various knots and hitches may be used to attach the rope to the anchor point. Common choices include the figure-eight follow-through, bowline, clove hitch, or other knots suitable for the specific application.
A simple anchor and system is typically used in less complex rope rescue or rigging scenarios where the requirements for load distribution, specialized hardware, or complex setups are minimal. However, even in simple setups, safety remains a top priority, and proper training and adherence to industry standards are essential to ensure the anchor and system are correctly established and monitored throughout the operation.
Defining the Anchor Form –
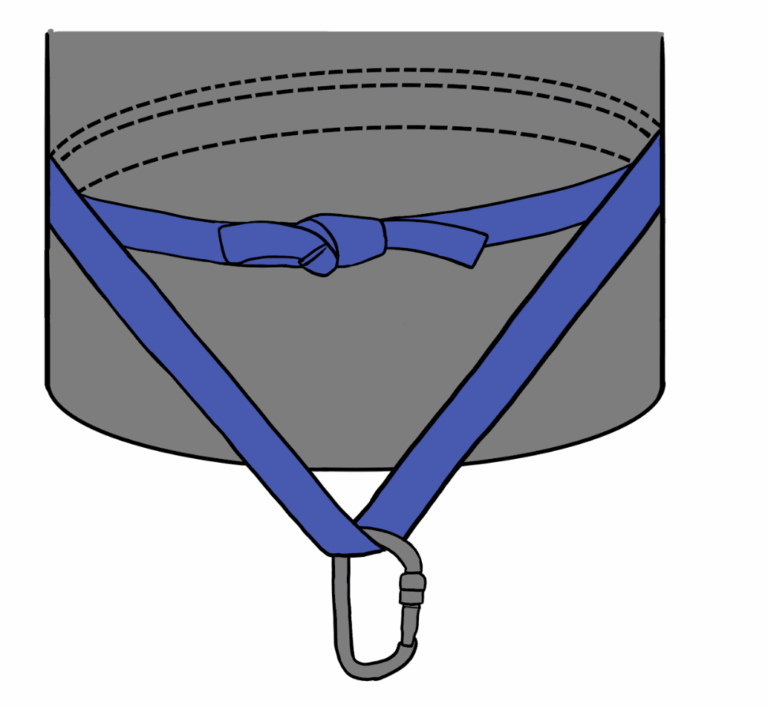
A “girth” or “choker” anchor refers to a type of anchor configuration used in rope rescue and rigging. This anchor is created by looping a rope or sling around an object and cinching it tight, essentially choking the object with the rope or sling. This method is employed when there is a need to secure a rope or rigging system to an anchor point that may not have a suitable attachment point or when other anchor options are limited.
Here’s how a girth or choker anchor works:
- Object Selection: The rescuer or rigger identifies a suitable object in the environment, such as a tree, post, beam, or similar sturdy structure, that can serve as an anchor point.
- Loop Creation: A length of rope or a sling is passed around the chosen object to create a loop. The rope or sling should encircle the object completely.
- Cinching: The two ends of the rope or sling are brought together, and a cinching mechanism is applied to tighten the loop securely around the object. This can be achieved by using a friction hitch, a mechanical device like a prusik cord or a mechanical rope grab, or by manually pulling the ends tight and securing them with appropriate knots.
- Load Distribution: To distribute the load evenly and prevent damage to the object and the rope or sling, it’s essential to ensure that the cinched loop is positioned correctly and that the load is evenly distributed around the object.
- Safety Checks: Rescuers or riggers should conduct safety checks to ensure that the girth or choker anchor is secure, properly positioned, and capable of supporting the anticipated loads during the rescue or rigging operation.
Girth or choker anchors are versatile because they can be used in situations where other anchor points are not readily available. However, it’s important to consider the strength and stability of the object being used as an anchor, as well as the cinching mechanism and the type of rope or sling being employed. The cinching mechanism must be reliable and capable of maintaining tension under load, and the rope or sling should be appropriate for the intended use and inspected for wear or damage.
As with any anchor system in rope rescue and rigging, proper training, adherence to safety protocols, and regular inspections are essential to ensure the safety and effectiveness of girth or choker anchors.

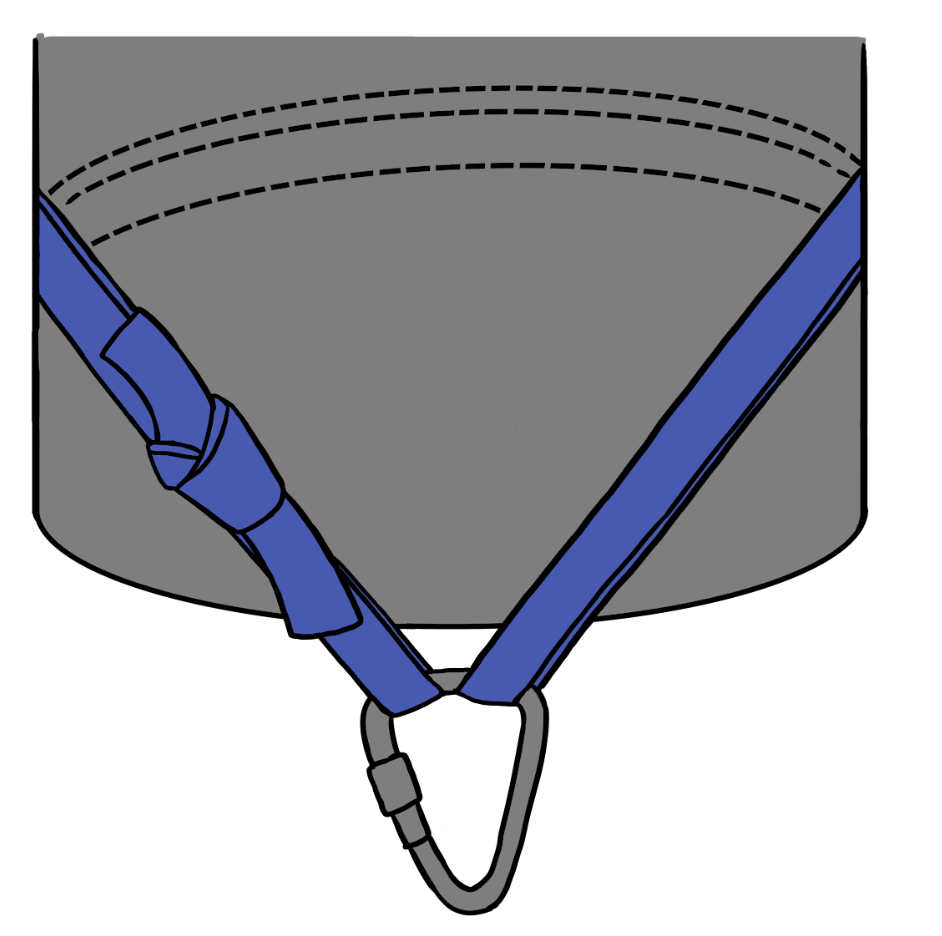
A “single loop” anchor, in the context of rope rescue and rigging, refers to an anchor system that involves creating a loop with a rope or sling and securing it to a suitable anchor point. This loop configuration is used to attach ropes, hardware, or rigging components for various purposes, such as load support, safety lines, or directional changes in a rope system.
Here are the key characteristics of a single loop anchor:
- Loop Formation: To create a single loop anchor, a length of rope or a sling is doubled over to form a closed loop. This loop is typically passed around a secure anchor point, such as a tree, beam, or anchor bolt, to establish the anchor.
- Attachment Method: The two ends of the rope or sling are then connected, often using a suitable knot or hitch, to secure the loop around the anchor point. Common knots used for this purpose include the figure-eight follow-through knot or the bowline.
- Purpose: Single loop anchors can serve various purposes in rope rescue and rigging. They may be used to anchor a main line for load support, create a belay anchor for safety, establish a redirect point to change the direction of a rope system, or set up a litter or rescue system attachment point.
- Load Distribution: When properly constructed, single loop anchors can distribute the load evenly around the anchor point, preventing excessive stress on any one part of the rope or sling.
- Safety Checks: As with any anchor system, it’s essential to perform safety checks to ensure that the single loop anchor is secure, correctly positioned, and capable of withstanding the expected loads during the rescue or rigging operation.
Single loop anchors are versatile and commonly used in rope rescue and rigging due to their simplicity and effectiveness. They provide a stable and secure attachment point when properly configured and used in conjunction with appropriate knots or hitches.
However, it’s crucial to consider factors such as the strength of the anchor point, the load anticipated during the operation, the type and condition of the rope or sling being used, and the potential for any sharp edges or abrasive surfaces that could damage the anchor system. Proper training and adherence to industry safety standards are essential to ensure the safety and reliability of single loop anchors in rope rescue and rigging scenarios.

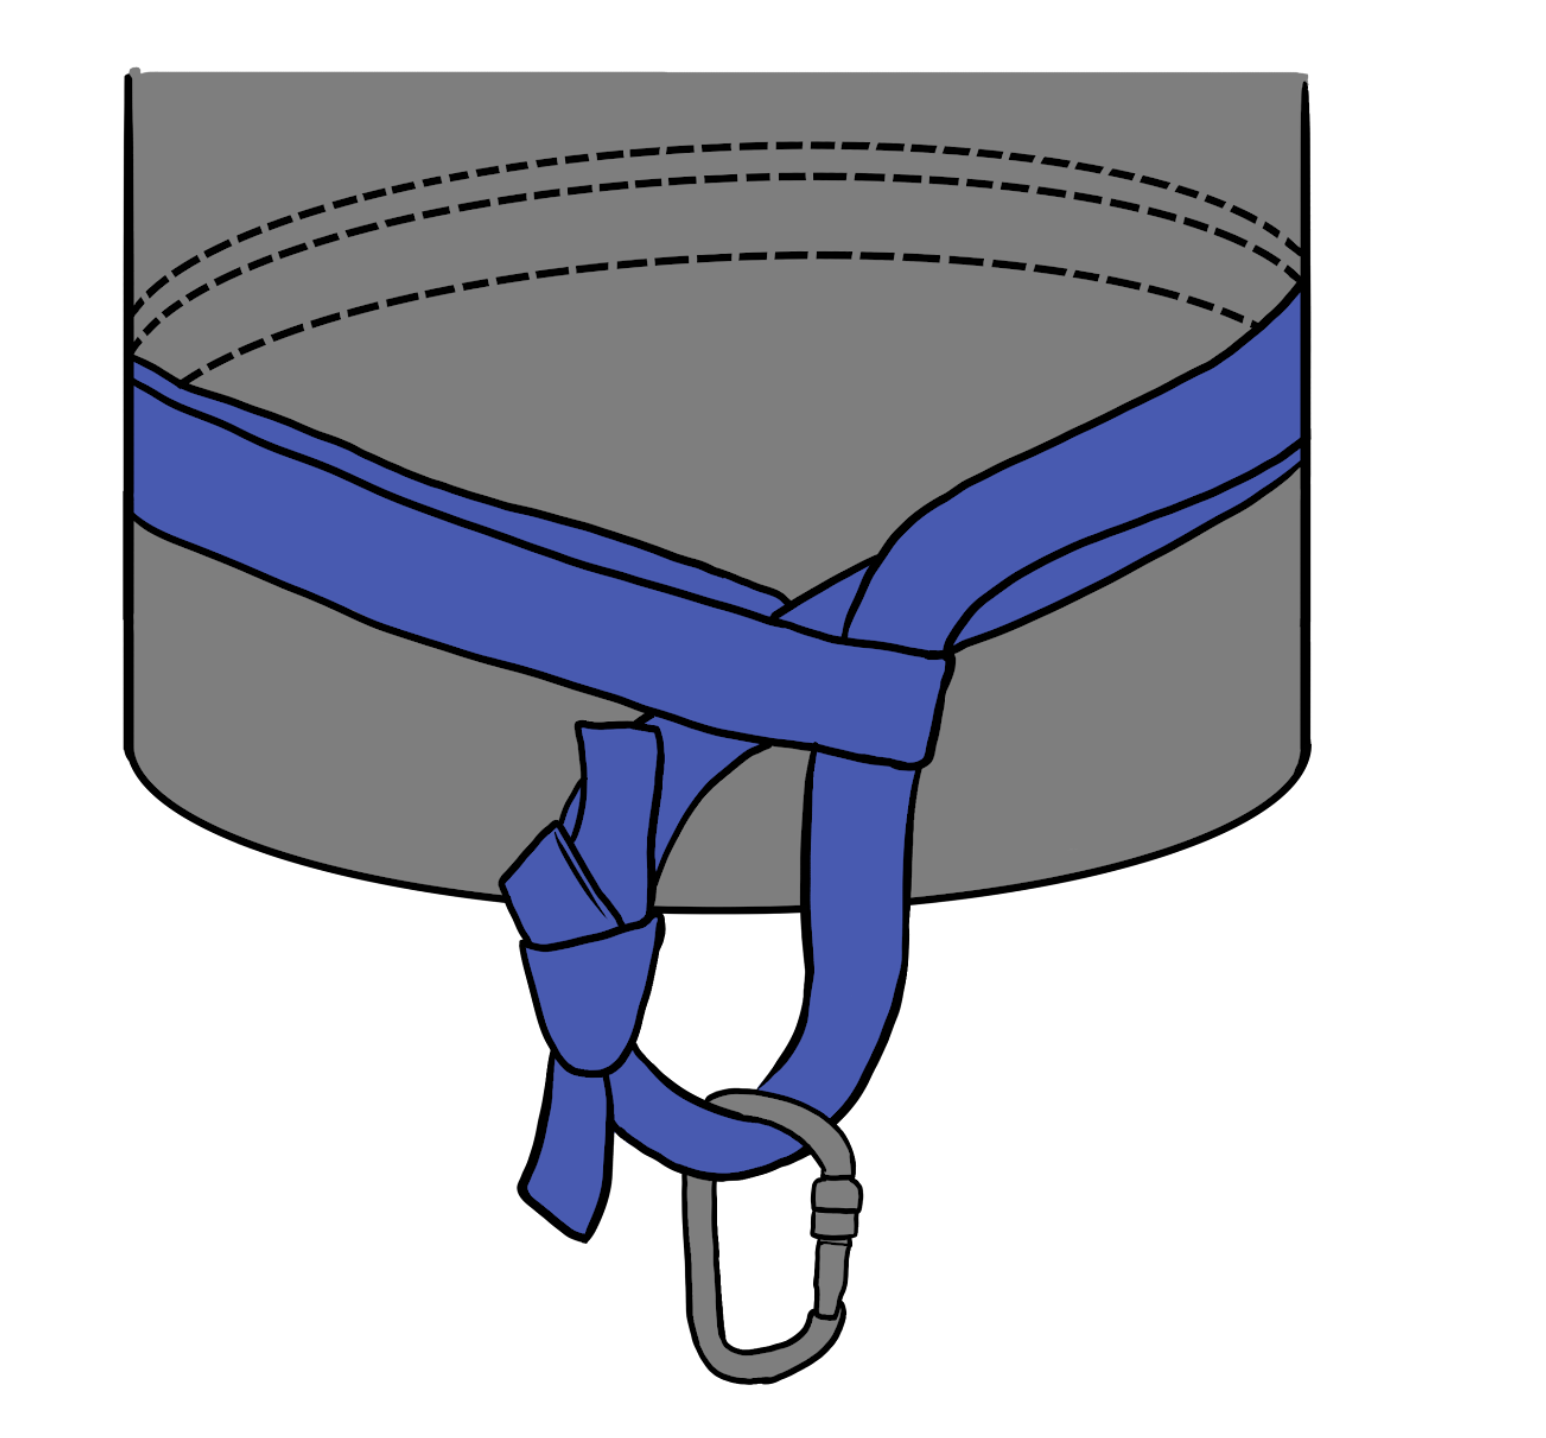
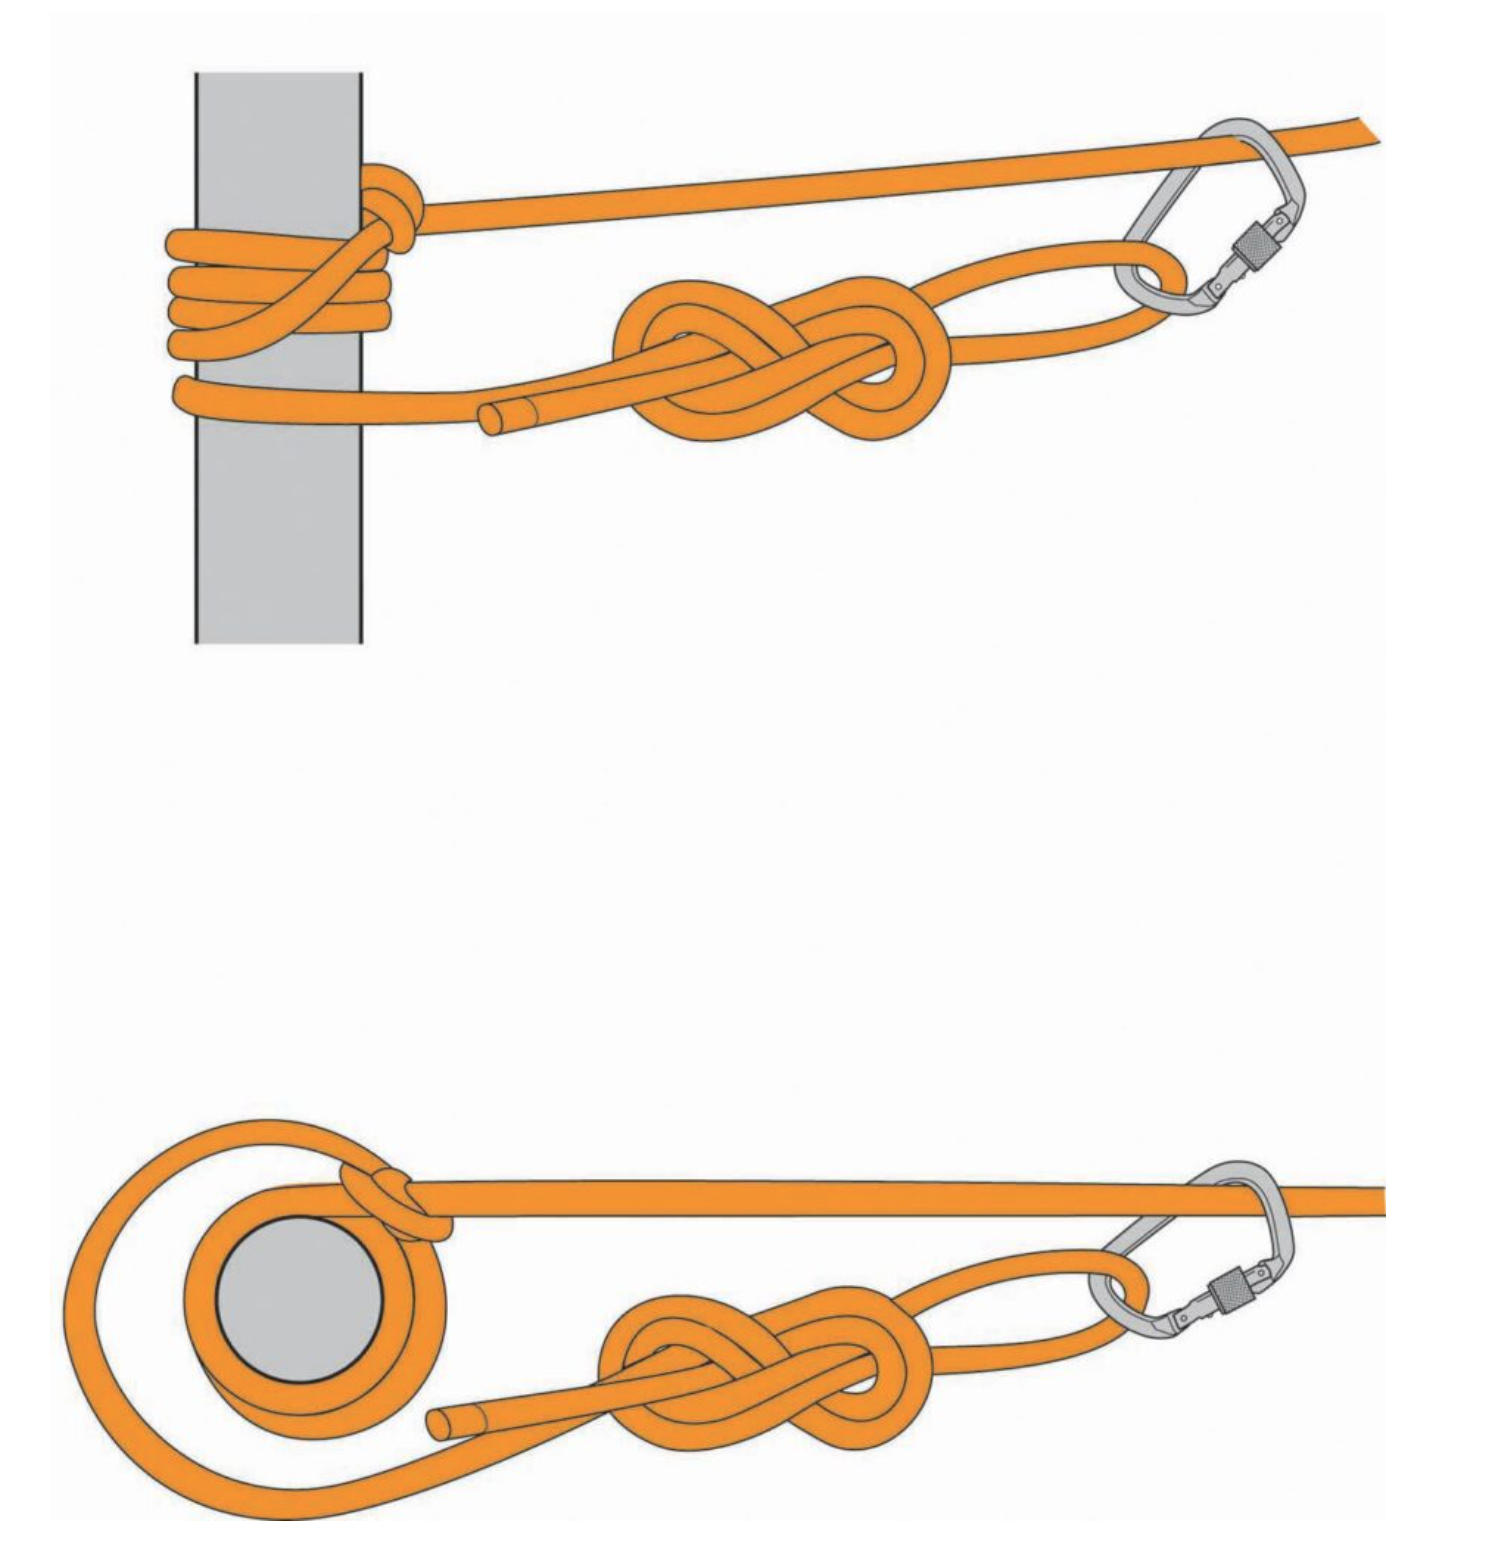
A “wrap 2 pull 1” anchor is a specific type of anchor setup used in rope rescue and rigging. This anchor configuration involves wrapping a length of rope around an anchor point two times and then pulling one end of the rope to create tension and secure the rope to the anchor point. This method is employed to create a secure attachment point when more traditional knot-based anchors or hardware may not be suitable or available.
Here’s how a “wrap 2 pull 1” anchor works:
- Anchor Selection: The rescuer or rigger identifies a suitable anchor point, such as a sturdy tree, post, or structural element.
- Wrap the Rope: A rope is passed around the anchor point, and the free end of the rope is brought back towards the anchor point to create a loop. This loop forms the first wrap around the anchor.
- Second Wrap: The rope is passed around the anchor point once again, creating a second wrap.
- Tensioning: After completing the second wrap, one end of the rope is pulled tight, creating tension and securing the wraps around the anchor point. This tension prevents the rope from slipping and forms the anchor.
- Load Distribution: The wraps around the anchor point help distribute the load evenly, preventing excessive stress on any single point of the rope.
- Safety Checks: As with any anchor system, it’s crucial to perform safety checks to ensure that the “wrap 2 pull 1” anchor is secure, correctly positioned, and capable of supporting the expected loads during the rescue or rigging operation.
“Wrap 2 pull 1” anchors are often used in situations where a quick and simple anchor is needed, and more complex knot-based anchors or specialized hardware are not readily available or necessary. However, the suitability of this anchor configuration depends on factors such as the strength and stability of the anchor point, the type and condition of the rope, and the expected loads.
Proper training and adherence to safety practices are essential when using any anchor system in rope rescue and rigging to ensure the safety of both rescuers and victims. Additionally, it’s important to evaluate the specific circumstances of each rescue or rigging operation to determine the most appropriate anchor setup.

A “redundant double loop” anchor is an anchor configuration used in rope rescue and rigging that involves creating two separate loops or attachments to an anchor point, adding redundancy to the anchor system. This redundancy is implemented to enhance safety by providing a backup attachment in case one of the loops or connections were to fail.
Here’s how a “redundant double loop” anchor typically works:
- Anchor Point Selection: A suitable anchor point is identified, such as a sturdy tree, structural element, or dedicated anchor system.
- Attachment Loop #1: A rope or sling is attached to the anchor point to create the first loop. This loop is securely connected to the anchor using an appropriate knot, hitch, or hardware.
- Attachment Loop #2: A separate length of rope or sling is attached to the same anchor point, creating a second loop. This loop is attached independently of the first loop and uses a different attachment method.
- Load Distribution: The load is distributed between the two loops. This means that if one loop or attachment were to fail, the second loop would still provide a secure anchor, preventing a catastrophic failure of the anchor system.
- Safety Checks: As with any anchor system, safety checks should be performed to ensure that both loops in the “redundant double loop” anchor are secure, correctly positioned, and capable of supporting the expected loads during the rescue or rigging operation.
The redundancy provided by the “redundant double loop” anchor configuration enhances safety by reducing the risk of anchor failure due to factors like equipment wear, unexpected stresses, or damage. This setup is particularly useful in high-risk scenarios where failure of the anchor point could have severe consequences.
However, it’s important to keep in mind that creating a redundant anchor adds complexity to the system, and it requires additional time and resources to set up and manage. Therefore, rescuers and riggers should carefully assess the specific circumstances of each operation to determine whether a redundant anchor is necessary and worth the extra effort.
Proper training and adherence to safety protocols are essential when implementing any anchor system, including “redundant double loop” anchors, to ensure the safety and effectiveness of rope rescue and rigging operations.

A “wrap 3 pull 2” anchor is a specific anchor setup used in rope rescue and rigging. This configuration involves wrapping a length of rope around an anchor point three times and then pulling two of those wraps tight while leaving the third wrap loose. This method is employed to create a secure attachment point when more traditional knot-based anchors or hardware may not be suitable or available.
Here’s how a “wrap 3 pull 2” anchor typically works:
- Anchor Point Selection: The rescuer or rigger identifies a suitable anchor point, such as a sturdy tree, post, or structural element.
- Wrap the Rope Three Times: A rope is passed around the anchor point, and the free end of the rope is brought back towards the anchor point to create a loop. This loop forms the first wrap around the anchor. The rope is then wrapped around the anchor point two more times, creating a total of three wraps.
- Tightening: After completing the three wraps around the anchor point, two of the wraps are pulled tight while the third wrap remains loose. The two tight wraps create the anchor, while the loose wrap helps secure the system in place.
- Load Distribution: The wraps around the anchor point help distribute the load evenly, preventing excessive stress on any single point of the rope.
- Safety Checks: As with any anchor system, it’s crucial to perform safety checks to ensure that the “wrap 3 pull 2” anchor is secure, correctly positioned, and capable of supporting the expected loads during the rescue or rigging operation.
“Wrap 3 pull 2” anchors are often used in situations where a quick and simple anchor is needed, and more complex knot-based anchors or specialized hardware are not readily available or necessary. This method can provide a secure attachment point, particularly when the anchor point is sturdy and the wraps are pulled tight to create a stable anchor.
However, as with any anchor system, the suitability of the “wrap 3 pull 2” anchor depends on factors such as the strength and stability of the anchor point, the type and condition of the rope, and the expected loads. Proper training and adherence to safety practices are essential to ensure the safety of both rescuers and victims during rope rescue and rigging operations.
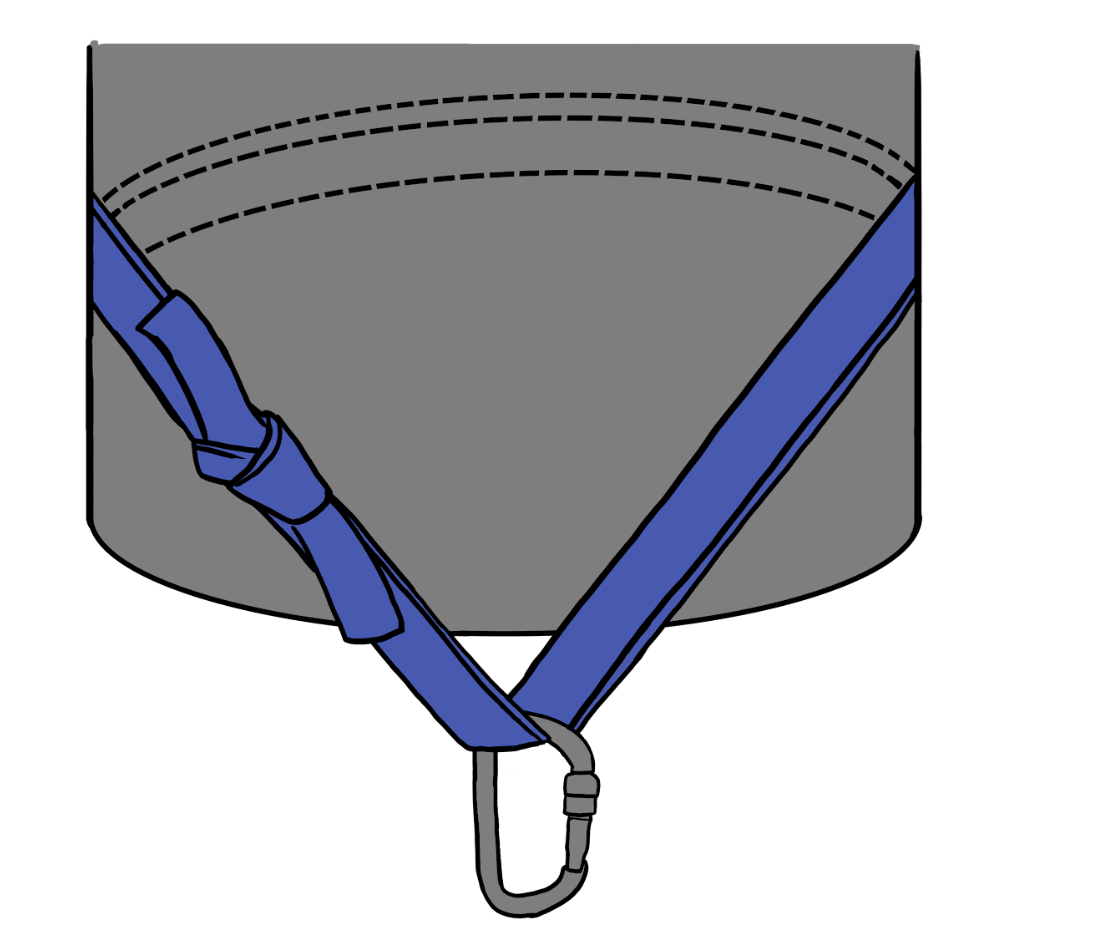
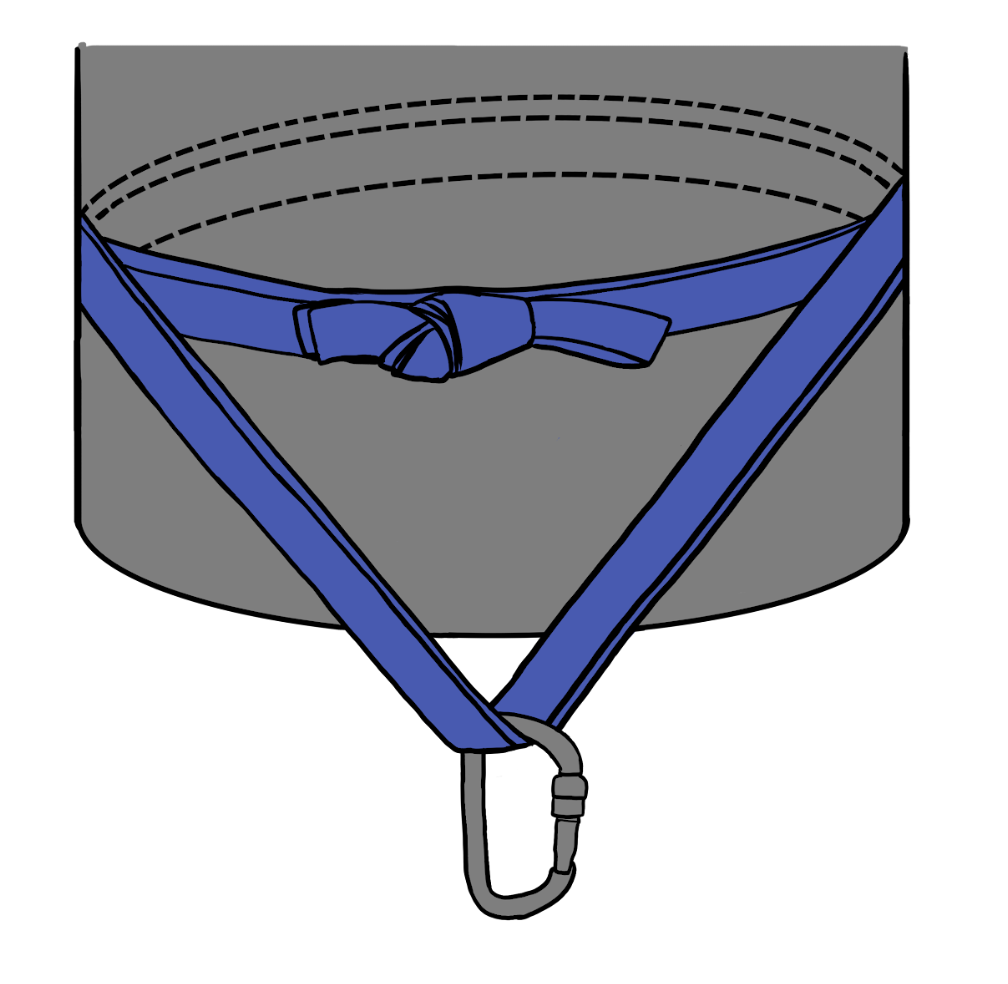
A “basket hitch” anchor is a rigging technique used in rope rescue and rigging operations to create a secure attachment point around an object or load. It involves passing a sling or rope around the object in such a way that it forms a “basket” shape, cradling the object from multiple sides. This method is employed to evenly distribute the load and provide a stable anchor point.
Here’s how a basket hitch anchor typically works:
- Object Selection: The rescuer or rigger identifies an object or load that needs to be secured or lifted. This object can be cylindrical or have a shape suitable for creating a basket-like configuration.
- Loop Formation: A sling, rope, or webbing is passed around the object so that it encircles the object and forms a loop. This loop should create a basket shape around the object, with two legs extending outward.
- Attachment Method: The two legs of the loop are brought together and attached to a central point. This attachment point can be made using a carabiner, a knot, or other appropriate hardware.
- Load Distribution: The basket hitch configuration helps distribute the load evenly around the object, preventing excessive stress on any one side. This is particularly useful when lifting or securing objects that may be heavy or have irregular shapes.
- Safety Checks: As with any anchor system, it’s essential to perform safety checks to ensure that the basket hitch anchor is secure, correctly positioned, and capable of supporting the expected loads during the rescue or rigging operation.
Basket hitches are versatile and can be used in a wide range of situations, including lifting, hauling, and securing loads. They are especially useful when dealing with objects that may be too large or awkwardly shaped for other anchor methods. However, it’s crucial to consider factors such as the strength of the material used for the sling or rope, the weight and shape of the object, and the expected forces during the operation.
Proper training and adherence to safety protocols are essential when implementing a basket hitch anchor or any other rigging technique in rope rescue and rigging scenarios. This helps ensure the safety of both rescuers and victims during operations.
A “double loop” anchor is a specific type of anchor configuration used in rope rescue and rigging. This anchor setup involves creating two separate loops or attachments to an anchor point, adding redundancy to the anchor system. The primary purpose of redundancy in a double loop anchor is to enhance safety by providing a backup attachment in case one of the loops or connections were to fail.
Here’s how a “double loop” anchor typically works:
- Anchor Point Selection: The rescuer or rigger identifies a suitable anchor point, such as a sturdy tree, structural element, or dedicated anchor system.
- Attachment Loop #1: A rope or sling is attached to the anchor point to create the first loop. This loop is securely connected to the anchor using an appropriate knot, hitch, or hardware.
- Attachment Loop #2: A separate length of rope or sling is attached to the same anchor point, creating a second loop. This loop is attached independently of the first loop and uses a different attachment method.
- Load Distribution: The load is distributed between the two loops. This means that if one loop or attachment were to fail, the second loop would still provide a secure anchor, preventing a catastrophic failure of the anchor system.
- Safety Checks: As with any anchor system, safety checks should be performed to ensure that both loops in the “double loop” anchor are secure, correctly positioned, and capable of supporting the expected loads during the rescue or rigging operation.
The redundancy provided by the “double loop” anchor configuration enhances safety by reducing the risk of anchor failure due to factors like equipment wear, unexpected stresses, or damage. This setup is particularly useful in high-risk scenarios where the failure of the anchor point could have severe consequences.
However, it’s important to keep in mind that creating a redundant anchor adds complexity to the system, and it requires additional time and resources to set up and manage. Therefore, rescuers and riggers should carefully assess the specific circumstances of each operation to determine whether a double loop anchor is necessary and worth the extra effort.
Proper training and adherence to safety protocols are essential when implementing any anchor system, including “double loop” anchors, to ensure the safety and effectiveness of rope rescue and rigging operations.
A “redundant wrap 2 pull 1” anchor is a specific anchor setup used in rope rescue and rigging. This anchor configuration involves wrapping a length of rope around an anchor point two times and then pulling one of those wraps tight while leaving the other wrap loose. Additionally, the setup includes a redundant or backup anchor attachment point, adding an extra layer of security to the anchor system.
Here’s how a “redundant wrap 2 pull 1” anchor typically works:
- Anchor Point Selection: The rescuer or rigger identifies a suitable anchor point, such as a sturdy tree, structural element, or dedicated anchor system.
- Attachment Loop #1: A rope is passed around the anchor point, and the free end of the rope is brought back towards the anchor point to create a loop. This loop forms the first wrap around the anchor.
- Attachment Loop #2 (Redundant Attachment): A separate length of rope or a sling is attached to a different point on the anchor or to a secondary anchor point, creating a redundant attachment loop.
- Wrap the Rope Again: With the primary attachment loop (#1) and the redundant attachment loop (#2) in place, the rope is wrapped around the anchor point a second time to create a second wrap.
- Tightening: After completing the second wrap around the anchor point, one end of the rope from the primary attachment loop (#1) is pulled tight, creating tension and securing the wraps around the anchor point. This tension prevents the rope from slipping and forms the primary anchor. The redundant attachment loop (#2) remains in place as a backup.
- Load Distribution: The wraps around the anchor point help distribute the load evenly, preventing excessive stress on any one point of the rope.
- Safety Checks: As with any anchor system, it’s essential to perform safety checks to ensure that both the primary and redundant components of the “redundant wrap 2 pull 1” anchor are secure, correctly positioned, and capable of supporting the expected loads during the rescue or rigging operation.
The “redundant wrap 2 pull 1” anchor configuration adds an extra layer of safety by providing a backup attachment point (redundant attachment loop) in case the primary anchor or attachment were to fail. This redundancy can be crucial in high-risk scenarios where anchor failure could lead to serious consequences.
Proper training and adherence to safety practices are essential when implementing a “redundant wrap 2 pull 1” anchor or any other anchor system in rope rescue and rigging operations to ensure the safety of both rescuers and victims.
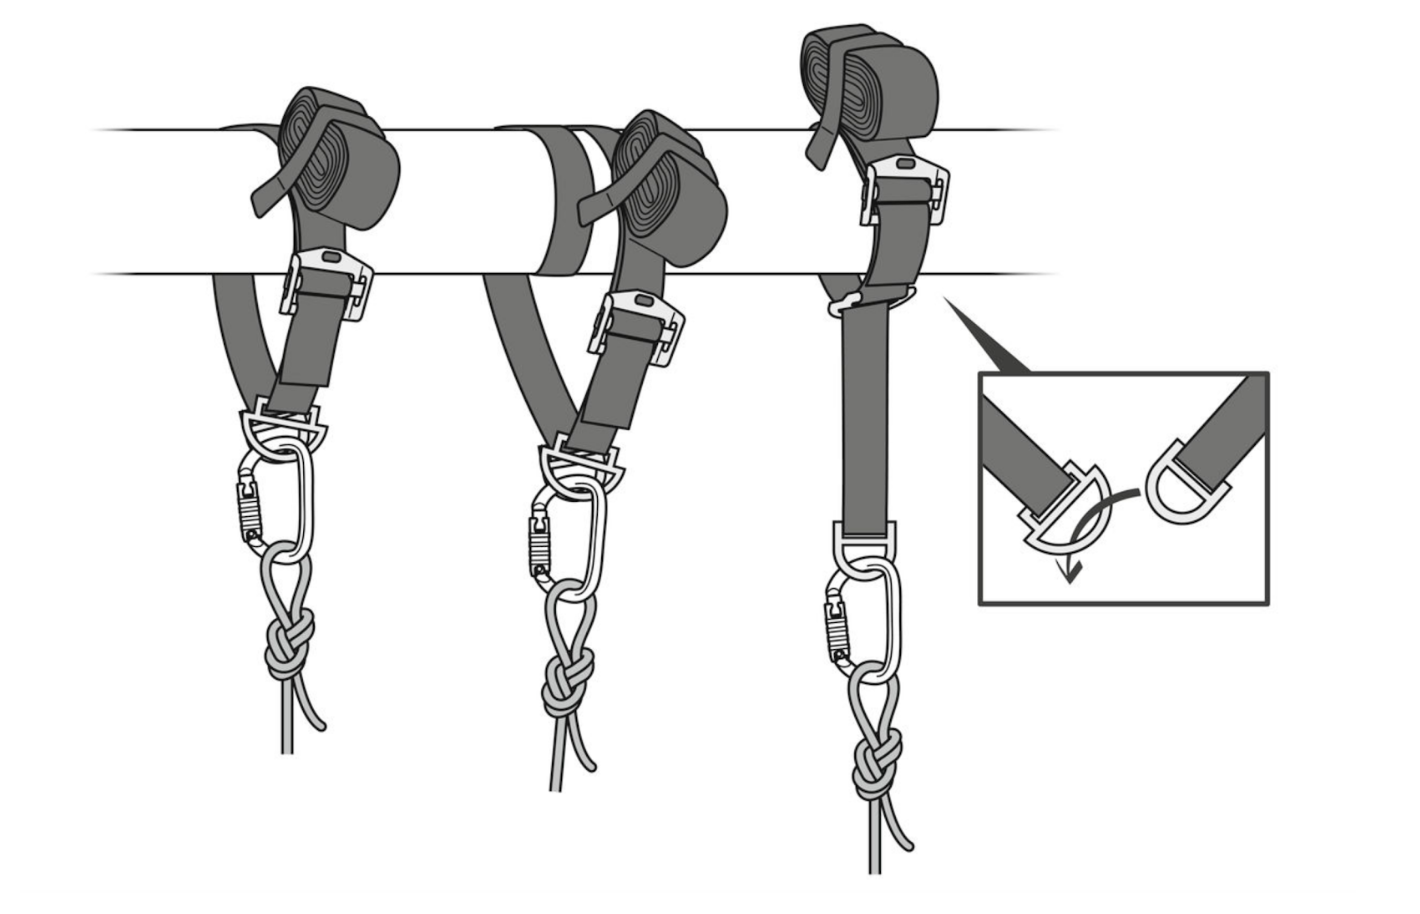
A “basket with anchor strap” anchor is a configuration used in rope rescue and rigging to secure a load or create an anchor point. This setup involves creating a “basket” around a load or anchor point using a rope or webbing and then attaching an anchor strap to provide additional security and stability. It’s a versatile technique often used in scenarios where a load needs to be lifted, stabilized, or secured.
Here’s how a “basket with anchor strap” anchor typically works:
- Load or Anchor Selection: The rescuer or rigger identifies the load that needs to be secured or the anchor point to which they want to attach a rope or rigging system.
- Create the Basket: A length of rope, webbing, or sling is passed around the load or anchor point to create a “basket” shape. This means that the rope or webbing encircles the load or anchor point from multiple sides, creating a cradle-like configuration.
- Anchor Strap Attachment: An anchor strap is attached to the rope or webbing. The anchor strap typically features a loop at one end for attachment and adjustment hardware, such as carabiners or shackles.
- Load Distribution: The basket configuration helps distribute the load evenly around the load or anchor point, preventing excessive stress on any single point. The anchor strap adds an additional layer of security and stability.
- Attachment to Main Rope or Rigging: The anchor strap is then connected to the main rope or rigging system being used for the rescue or rigging operation.
- Safety Checks: As with any anchor system, it’s essential to perform safety checks to ensure that the “basket with anchor strap” anchor is secure, correctly positioned, and capable of supporting the expected loads during the operation.
This configuration is commonly used in scenarios such as raising or lowering heavy loads, securing equipment during rigging operations, or creating stable anchor points. The anchor strap provides an extra level of security, and it can be quickly adjusted or detached as needed.
The choice of materials (rope, webbing, or sling), the strength of the anchor strap, and the hardware used for attachment should all be considered based on the specific requirements of the rescue or rigging operation.
Proper training and adherence to safety practices are essential when implementing a “basket with anchor strap” anchor or any other anchor system in rope rescue and rigging scenarios to ensure the safety of both rescuers and victims.
A “high-strength tie-off” anchor is a type of anchor setup used in rope rescue and rigging that is specifically designed to provide an extremely strong and secure attachment point for ropes or rigging systems. This anchor configuration is essential when dealing with heavy loads or situations where the anchor point needs to withstand significant forces without compromising safety.
Here are some key characteristics and considerations related to a “high-strength tie-off” anchor:
- Anchor Selection: When setting up a high-strength tie-off anchor, it’s crucial to select an anchor point that is exceptionally sturdy and capable of withstanding the expected loads. This may include dedicated anchor systems, structural elements, or other robust anchor points.
- Attachment Method: High-strength tie-off anchors often involve using heavy-duty webbing, slings, or specialized anchor straps designed to handle extreme loads. These materials are typically rated for high tensile strength.
- Knots and Hitches: To secure the webbing, slings, or anchor straps to the anchor point, specialized knots and hitches may be used. Common choices include the water knot (overhand bend), barrel knot, or specialized hitches like the clove hitch or girth hitch.
- Load Distribution: The design of the high-strength tie-off anchor aims to distribute the load evenly across the anchor point and the attachment materials, reducing the risk of overload or failure.
- Safety Factors: High-strength tie-off anchors are typically engineered with a significant safety margin to ensure they can handle loads well beyond the expected working loads. Safety factors are used to account for variations in the load and potential shock loading.
- Hardware: In some cases, additional hardware such as carabiners, shackles, or specialized anchor devices may be used to create a high-strength tie-off anchor, adding further security and versatility.
High-strength tie-off anchors are commonly used in scenarios where heavy loads are involved, such as high-angle rescues, industrial rigging, heavy equipment lifting, and other situations where the anchor point’s integrity is critical. These anchors are designed to meet or exceed industry standards for safety and reliability.
Proper training and experience are essential when setting up and utilizing high-strength tie-off anchors to ensure that they are correctly configured and capable of withstanding the specific loads and conditions of the operation. Additionally, regular inspections and maintenance of anchor components are necessary to ensure their continued reliability and safety.
1.3 Anchor Considerations
Before delving into more advanced topics, let’s start with some fundamental tips to ensure that everything remains practical and accessible.
Anchor considerations are of paramount importance in rope rescue and rigging operations. The choice and configuration of anchors play a critical role in ensuring the safety and success of these operations. Several key factors must be carefully evaluated when determining anchor points.
Placement: Proper anchor placement is fundamental. Anchors must be attached to stable and robust structures or natural features that can handle the anticipated loads. The anchor point should be selected with care, considering factors like the structural integrity of the object, its ability to withstand forces in various directions, and its resistance to wear or damage caused by rope friction.
Anticipated Loads: Understanding the anticipated loads is crucial for anchor selection and configuration. Rescuers and riggers must consider both static and dynamic loads, as well as any potential shock-loading scenarios. Anchors should be chosen and configured to handle these loads safely, ensuring that they do not exceed the anchor’s safe working capacity.
Change of Direction: In many rope rescue and rigging operations, the direction of the rope or rigging system needs to be altered to reach the target or create efficient lines of pull. Anchors must be positioned to accommodate these changes of direction. This may involve using specialized devices like pulleys or mechanical advantage systems to redirect the rope without compromising anchor integrity.
Location: The location of the anchor point relative to the rescue or rigging operation is vital. It should be strategically placed to provide the necessary angles and lines of pull to achieve the desired outcome. A well-positioned anchor minimizes the risk of obstructions, edge hazards, or obstacles that could compromise safety or impede the rescue.
Dynamic Loads or Vector Forces: Rope rescue and rigging operations can subject anchors to dynamic loads or vector forces that vary in direction and intensity. Anchors must be able to withstand these forces without shifting, failing, or causing sudden changes in load. Dynamic load considerations are especially important when performing high-angle or high-tension operations.
In summary, anchor considerations are multifaceted and require a comprehensive understanding of the specific operational context. Proper training and experience are essential for rescuers and riggers to make informed decisions about anchor selection, placement, and configuration. By carefully evaluating these factors, teams can ensure the reliability and safety of their anchor systems, which is paramount in the world of rope rescue and rigging.
In rope rescue operations, paying attention to the specific conditions and challenges of the rescue site is critical when considering anchor placement and configuration. Here are some key considerations related to steam lines affecting nylon and other materials, sharp areas, and padding the anchor:
Steam Lines Effecting Nylon and Other Materials: Steam lines or other high-temperature sources can pose a significant risk to nylon and other synthetic materials used in rope rescue systems. Nylon and similar materials can degrade and lose their strength when exposed to high temperatures. Therefore, rescuers must be vigilant about identifying and avoiding contact with steam lines or any heat sources. Anchors should be positioned in locations where they are shielded from heat, and ropes or slings should not come into direct contact with hot surfaces. Using heat-resistant materials or thermal insulation can be considered when dealing with potential heat hazards.
Sharp Areas: Sharp edges and abrasive surfaces can damage ropes and slings, leading to potential failure of the anchor system. During anchor placement, it is crucial to inspect the anchor point and its immediate surroundings for any sharp edges or protrusions. If such hazards are present, precautions should be taken to protect the rope. This may involve using edge protection devices like edge rollers or rope protectors, or selecting an alternative anchor point that is free from sharp areas.
Padding the Anchor: In some cases, adding padding to the anchor point can help protect both the anchor system and the object to which it is attached. Padding materials like webbing or tubular webbing can be used to create a protective barrier between the anchor system and the anchor point. This padding serves multiple purposes: it reduces abrasion and wear on the rope or sling, it prevents damage to the anchor point, and it can help distribute the load more evenly. When using padding, it’s essential to ensure that it is correctly secured and does not introduce any new hazards, such as slippage or interference with hardware.
Considering the specific environmental and site-related challenges is crucial when establishing rescue anchors. Factors like heat sources, sharp edges, and the need for padding should be carefully assessed to mitigate risks and ensure the safety and effectiveness of the anchor system. Proper training and experience in recognizing and addressing these factors are essential for successful rope rescue operations.
How About A Conversation Between 2 People Discussing Interior Angles of 90°-120°?
The data will be shown later in this Chapter
Person A: Hey, I’ve been learning about rigging angles, and I came across the concept of internal angles between 90° and 120°. Can you tell me more about that?
Person B: Sure, I’d be happy to! Rigging internal angles in that range, between 90° and 120°, are indeed interesting. They can be a bit of a balancing act. Ideally, you’d want a 90° angle because it’s the most efficient and stable angle for rigging.
Person A: That makes sense, but what happens when the angle is more than 90°, like 120°?
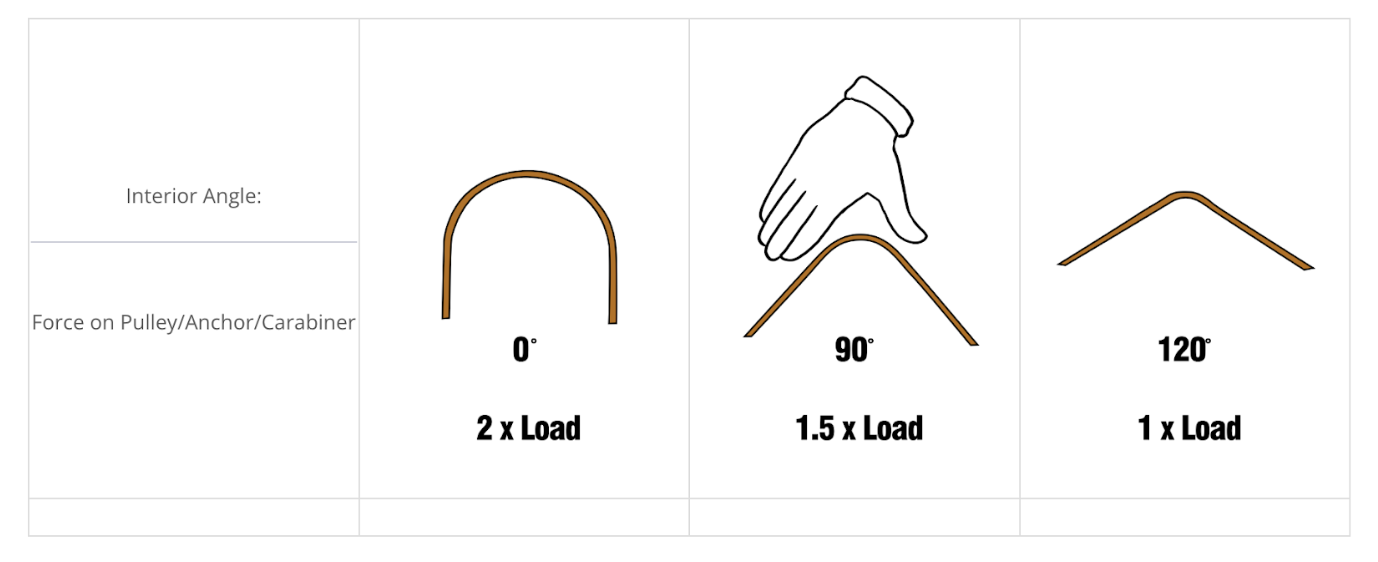
Person B: Well, when you go beyond 90° and approach 120°, the forces on the rigging can change quite a bit. The tension in the ropes or slings increases, which can put extra stress on the anchor points and the rigging equipment. So, you have to be careful and make sure your anchor points can handle that added strain.
Person A: Got it, so it’s all about maintaining safety. But are there situations where you might have to work with angles greater than 90°, even if it’s not ideal?
Person B: Absolutely. Sometimes, the terrain or the structure you’re working with doesn’t allow for a perfect 90° angle. In those cases, you have to be flexible and adapt your rigging techniques. It might mean using specialized equipment or adjusting your anchor points to make it work safely.
Person A: So, it’s a matter of balancing the ideal 90° angle with the practicalities of the situation?
Person B: Exactly! Safety is always the top priority in rigging. While 90° is the ideal angle, real-world conditions often require flexibility and creativity in rigging setups. The key is to assess the situation, understand the forces involved, and make informed decisions to ensure a safe and effective rigging operation.
Person A: Thanks for explaining that. It’s good to know that there’s some flexibility built into rigging principles to handle different scenarios.
Leverage and Bending Moments

Leverage can indeed have an effect on an anchor, potentially creating a bending moment that can weaken the anchor point. The effect of leverage or bending moments on anchors is an important consideration in rigging and rope rescue operations.
Here’s how leverage can impact an anchor:
- Lever Arm: Leverage occurs when a force is applied at a distance from the anchor point, creating a lever arm. The longer the lever arm, the greater the potential for creating bending moments on the anchor.
- Bending Moment: When a force is applied at an angle to the anchor point or when the rope is redirected, it can generate a bending moment on the anchor. This bending moment creates a twisting or rotational force that the anchor point must resist.
- Stress on Anchor: The bending moment increases the stress on the anchor point, especially if it is not designed to handle forces applied at an angle or if the angle is too acute. Excessive stress can lead to anchor failure or compromise its integrity over time.
- Angle Matters: The angle at which the force is applied is crucial. Smaller angles, closer to 90°, are generally more favorable because they minimize the bending moment on the anchor. As the angle becomes more acute, the bending moment and stress on the anchor increase.
- Redirection and Multi-Point Anchoring: In scenarios where ropes are redirected or multiple anchor points are used, the effects of leverage and bending moments become even more complex. Rescuers and riggers must carefully assess the forces, angles, and anchor point strengths to ensure safety.
To mitigate the risks associated with leverage and bending moments, riggers often use techniques like edge protection, redirects, and specialized hardware to distribute forces more evenly and reduce the impact on the anchor point. Additionally, selecting anchor points that are robust and well-suited to the intended load direction is crucial for safety.
Understanding the forces acting on anchors is of paramount importance. Whether these anchors consist of webbing slung around a natural feature or ropes meticulously rigged in a complex system, their ability to withstand these forces hinges on a crucial concept known as the critical angle. This critical angle represents a pivotal point where the forces on an anchor transition from vertical to horizontal, fundamentally altering the load dynamics. As we delve into the intricate world of rope rescue and climbing, we must explore how these forces evolve and adapt as they encounter this critical angle, impacting not only the safety of the operation but also the efficiency and effectiveness of the rescue or ascent.

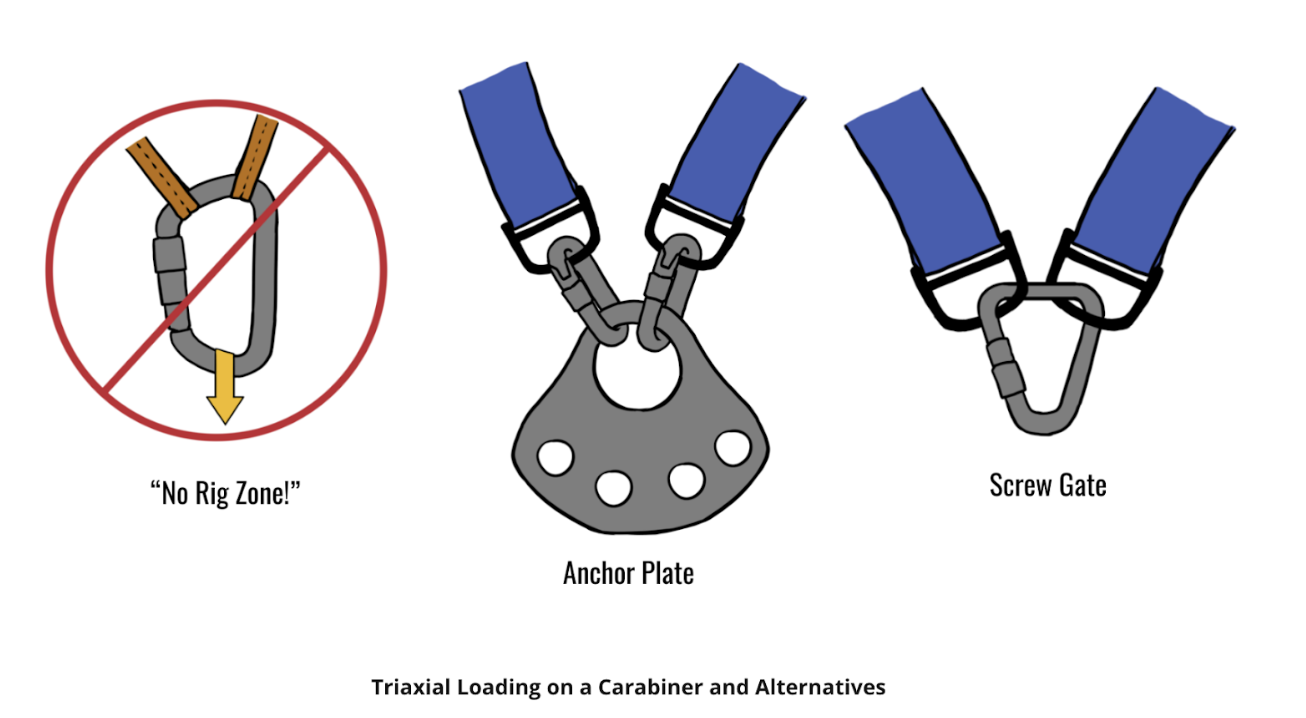
Triaxial loading is a term often used in structural engineering and materials science to describe a specific type of mechanical loading applied to a material or structure. This loading involves the simultaneous application of forces in three orthogonal directions, typically along the x, y, and z axes, creating a three-dimensional stress state.
In the context of rope rescue and anchors, “triaxial loading” typically refers to the complex forces that anchors experience when ropes are rigged in three dimensions. This concept is particularly relevant when setting up anchor systems for rope rescue operations in challenging environments such as cliffs, crevasses, or confined spaces.
1.4 Anchor Factors
There are many factors that need to be considered when choosing an anchor.
- The placement of the anchor is key
- Alignment with the load
- Proximity to the edge
Anticipation of the loading forces on the system is also key. This means having foresight as to vector angles and forces.
- Location
- Distance from the haul team
- Distance from the MA itself
Is the system one of a dual or 2 rope system or a mainline and tension belay. Dynamic loading will affect either of them uniquely.
- Less rope in the belay means less dropping of the load
- Minimum offset helps to prevent pendulum forces
- Safe distances doesn’t always mean proximity, but it might
What is the host for the anchor system?
- Wrapping a pipe ?
- Is the pipe hot?
- Near chemicals?
- Does it have edges?
- Bolts?
- Rock?
- Concrete?
- Other
- Trees
- Large?
- Multiple?
- Other
| 1″ Webbing Anchors: The Minimum Breaking Strength (MBS) |
| Tubular Web lbf (kN) | Flat Web lbf (kN) | ||
| Web Strength | 4,340 (19.31) | 6,000 (26.00) | |
| Choker or Girth Hitch | 4,799 (21.35) | 8,776 (39.04) | |
| Single Loop (90° Internal Angle) | 4,832 (21.50) | 6,130 (27.27) | |
| Wrap 2, Pull 1 (90° Internal Angle) | 5,510 (24.51) | 8,098 (36.02) | |
| Redundant Double Loop (90° Internal Angle) | 7,777 (34.59) | 10,786 (47.98) | |
| Wrap 3, Pull 2 (90° Internal Angle) | 7,899 (35.14) | 10,507 (46.74) | |
| Basket (90° Internal Angle) | 8,464 (37.650 | 12,989 (57.78) | |
| Double Loop (90° Internal Angle) | 8,716 (38.77) | 10,538 (46.88) | |
| Redundant, Wrap 2, Pull 1 (90 ° Internal Angle) | 9,700 (43.15) | 11,458 (50.97) |
- Webbing anchors and straps are extremely common in rescue. Single point anchor are often used as independent placements.
- Directional and nondirectional anchors can be problematic without an understanding of the weaknesses within the angles exerted on the material.
- Avoid tight and or pinching angles on the point of contact within the anchor systems (girth hitches would be an example of this)
We’ll touch in on things like “leveraging an anchor”, anchor forces and load relationships. All of these have to do with angles of deflection, vectors and torque.
We have a point of reference and an acceptable outcome. They may not be exact, but must be in agreement.
- Avoid wide angles as much as possible
- The critical angle is best at 90° or less.
- Angles between anchor points or “field angle” should not exceed 90°, as angle greater than this exerts forces that could exceed the load.
- At 120° each leg has 100% of the load.
- Learn the art of multipoint anchor distribution of the load.
1.5 Anchor Devices
In this lesson on rope rescue and rigging, we delve into the critical topic of anchor devices, a fundamental aspect of ensuring safety and stability in various industrial and rescue scenarios. This comprehensive exploration will encompass a range of anchor devices, including versatile anchor straps, industrial workhorses like wire rope slings, i-beam anchors designed for structural applications, reliable bolt-in anchors, and the versatility of anchor plates. Understanding the characteristics, applications, and best practices associated with these anchor devices is essential for riggers, rescuers, and professionals working in high-risk environments, where secure and reliable anchors are the cornerstone of success and safety.
Backed-Up Anchors
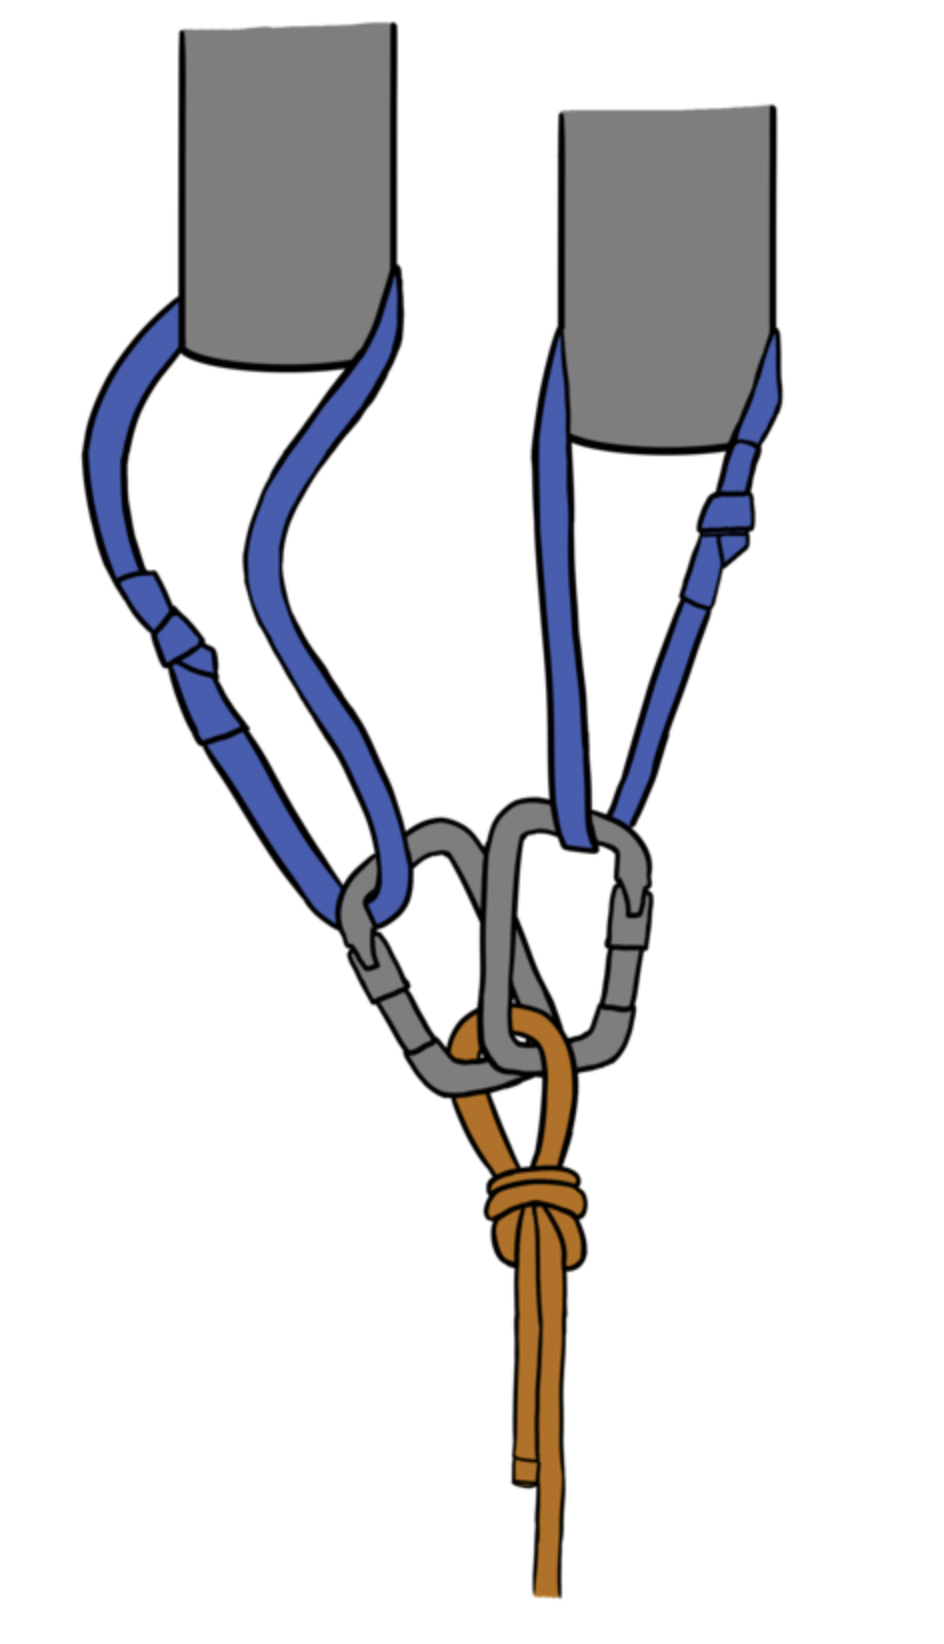
Backed-up anchors” refer to a configuration where the primary anchor point is supplemented or reinforced by one or more secondary anchors, providing an additional layer of safety and redundancy in rope rescue and rigging operations. These backup anchors are strategically employed to enhance the reliability and stability of the anchor system, mitigating the risks associated with anchor failure, equipment wear, or unexpected stresses.
The primary goal of using backed-up anchors is to enhance safety. In situations where anchor failure can have severe consequences, such as high-angle rescues or heavy-load lifting, the presence of backup anchors provides an extra layer of protection. If the primary anchor point were to fail, the backup anchors can seamlessly assume the load, preventing a catastrophic incident.
Backed-up anchors offer redundancy, ensuring that even if one anchor point fails, there is an alternative attachment point ready to support the load. This redundancy is especially valuable in complex rigging systems where multiple anchors may be employed.
When adjusting rigging systems or redirecting loads, the backup anchors minimize the risk associated with altering the primary anchor point. In high-risk environments where there is little room for error, such as confined space rescues or vertical descents, backed-up anchors are a fundamental part of the safety protocol.

Wire rope slings are essential components in the field of rigging and industrial applications, renowned for their strength, durability, and versatility. These slings are composed of multiple strands of steel wire twisted together, forming a robust and flexible rope. Wire rope slings come in various configurations, each tailored to specific tasks, and they play a critical role in lifting, securing, and moving heavy loads in a wide range of industries. In this discussion, we’ll explore the significance of wire rope slings, their various types, and their vital role in ensuring safety and efficiency in rigging and lifting operations.
Wire rope slings exhibit outstanding strength, making them suitable for handling heavy loads and withstanding significant stresses. Their strength-to-weight ratio is superior, which allows for efficient load-bearing capabilities.
Constructed from galvanized or stainless steel wires, wire rope slings are resistant to corrosion, moisture, and abrasion. This durability ensures a longer service life, even in harsh environments.
Wire rope slings come in various configurations, including single-leg, multi-leg, and braided slings, as well as with different end fittings like hooks or thimbles. This versatility allows them to adapt to diverse rigging and lifting requirements. And Despite their impressive strength, wire rope slings are also flexible and pliable, allowing for easy maneuvering around loads and providing secure attachment points.
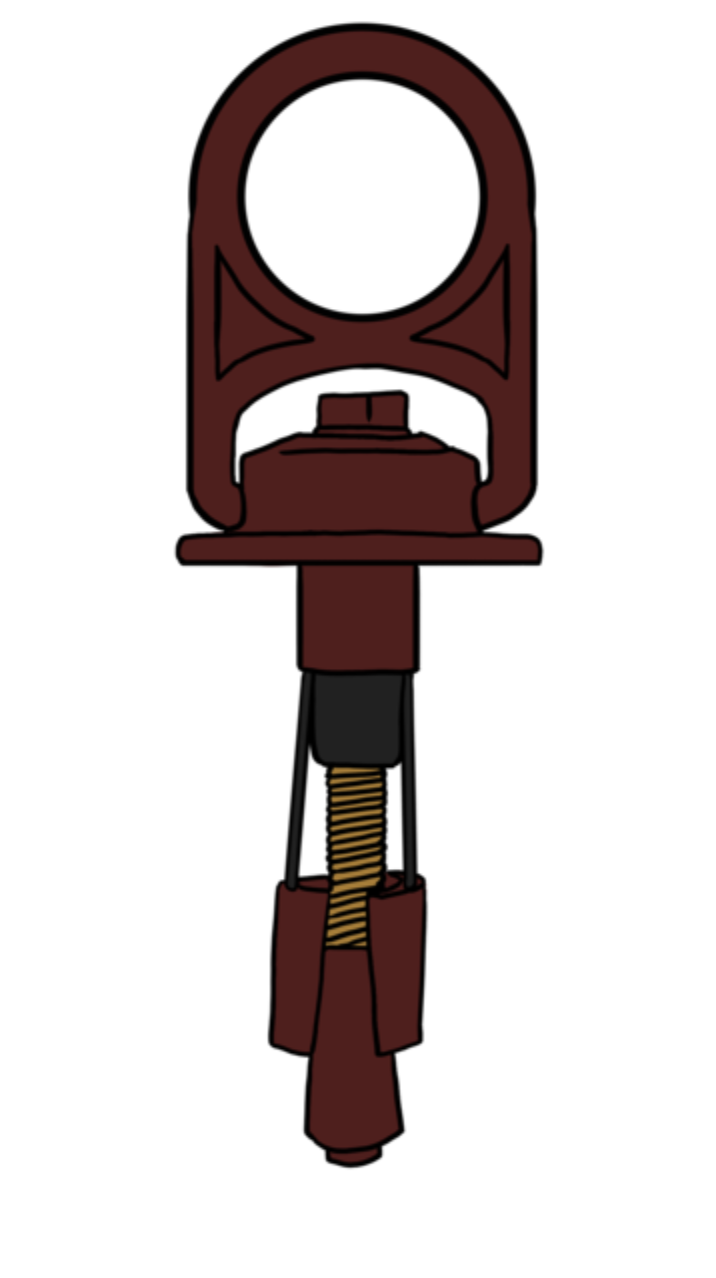
Bolt-in anchors, often referred to as concrete anchors or expansion anchors, are specialized anchor devices designed for securely attaching rigging equipment, safety systems, or structures to concrete, masonry, or other solid substrates. These anchors play a pivotal role in various industries, including construction, industrial maintenance, and rope access work. The key feature of bolt-in anchors is their ability to provide robust and reliable attachment points, ensuring safety and stability in vertical or horizontal applications where loads need to be secured. In this discussion, we will explore the significance of bolt-in anchors, their types, and their vital role in creating secure anchor points in concrete and masonry structures.
Bolt-in anchors are specifically designed for concrete and masonry, providing a reliable and secure attachment point. They are capable of withstanding substantial loads, making them essential for structural stability and safety.
These anchors come in various configurations, including wedge anchors, sleeve anchors, and expansion anchors, each suited to different applications. They can be used for both temporary and permanent installations.
- Wedge Anchors: These anchors feature a threaded stud with a cone-shaped end and are inserted into a predrilled hole. As the nut is tightened, the wedge-shaped end expands against the walls of the hole, creating a secure hold.
- Sleeve Anchors: Sleeve anchors consist of a threaded stud and a sleeve. When the nut is tightened, the sleeve expands within the hole, gripping the concrete or masonry tightly.
- Expansion Anchors: Expansion anchors are versatile and can be used in various substrates. They expand when the nut is tightened, creating a tight fit within the hole.
- Drop-in Anchors: Drop-in anchors are designed for flush-mount applications. They are placed into predrilled holes, and a threaded rod or bolt is inserted into the anchor, securing the load.
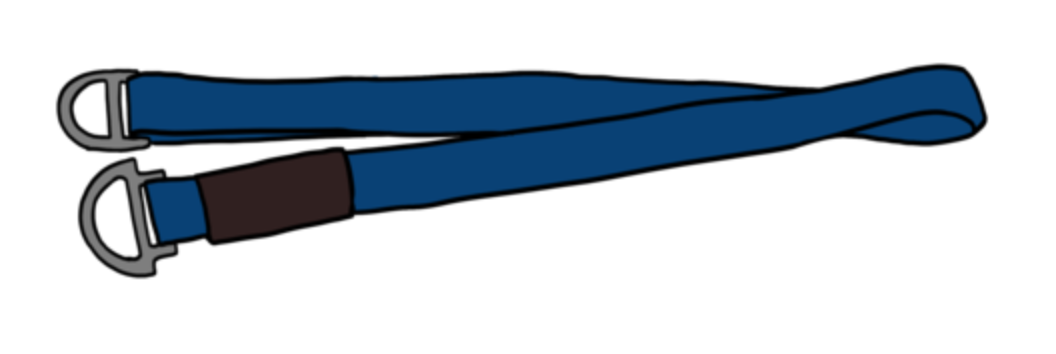
Anchor straps are fundamental components in rope rescue and rigging operations, designed to provide secure and adaptable attachment points for ropes, rigging systems, and equipment. These versatile straps are commonly used in a variety of scenarios, ranging from securing loads to creating stable anchors in industrial settings and rescue operations. Anchor straps come in various forms, including webbing slings, loops, and specialized configurations, making them indispensable tools for professionals working in construction, rigging, and rope access.
Anchor straps are highly versatile and can be used for a wide range of applications. They are employed in load securing, anchor point creation, load distribution, and other rigging tasks.
These straps are typically constructed from durable materials such as nylon, polyester, or aramid fibers, ensuring robustness and resistance to wear and tear; designed with multiple attachment points or loops, allowing for easy adjustment and adaptation to various anchor points, load configurations, and angles.
Types of anchor straps include:
- Webbing Slings: Webbing slings are flat, flexible straps made of webbing material. They come in various lengths, widths, and configurations, including single-leg and multi-leg slings. Webbing slings are ideal for creating anchor points, securing loads, and distributing loads evenly.
- Round Slings: Round slings are continuous loops of synthetic fibers encased in a protective sleeve. They are flexible and durable, capable of conforming to irregularly shaped loads or anchor points.
- Edge Protection Devices: These are specialized anchor strap accessories designed to protect both the strap and the anchor point from abrasion and damage, particularly when working near sharp edges.
- Anchor Straps with Built-in Rigging Hardware: Some anchor straps come with integrated rigging hardware such as D-rings or carabiners, offering additional versatility and convenience.

Anchor plates are essential components in rope rescue and rigging operations, serving as durable and reliable devices for creating secure anchor points on solid surfaces or structures. These plates are designed to distribute loads evenly and minimize wear and tear on ropes, slings, and other rigging equipment while enhancing the safety and stability of the anchor system. Anchor plates are commonly used in a variety of applications, including rock climbing, rope access work, rescue operations, and industrial rigging.
Anchor plates feature multiple attachment holes or slots, allowing for multiple connection points. This configuration helps distribute the load evenly across the plate, reducing the risk of concentrated stress on ropes or slings.
Anchor plates are typically constructed from robust materials like stainless steel or aluminum, ensuring durability and resistance to environmental factors such as corrosion.
Types of anchor plates include:
- Hanger Plates: These anchor plates are designed to be bolted onto solid surfaces such as rock walls, concrete, or structures. They are commonly used in climbing and caving for creating anchor points.
- Multi-Point Anchor Plates: Multi-point anchor plates feature several attachment holes or slots, allowing for multiple connections. They are ideal for creating complex rigging systems with multiple ropes or attachment points.
- Rescue Anchor Plates: Specifically designed for rescue operations, these plates often feature additional features such as built-in pulleys or rigging points for added versatility and convenience.
- Bolt Hangers: Bolt hangers are specialized anchor plates used for rock climbing and caving. They are bolted directly onto climbing anchors or bolts, providing secure attachment points for carabiners or quickdraws.
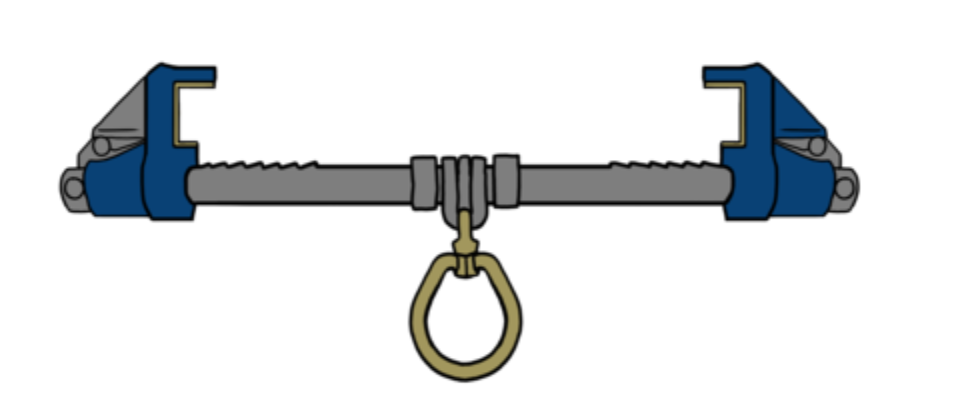
I-beam anchors, also known as I-beam clamps or beam trolleys, are specialized devices used in rigging and industrial applications to create secure attachment points on horizontal or vertical I-beams, beams, and other structural steel members. These anchors are essential tools for safely suspending loads, hoisting equipment, or positioning personnel when working on overhead structures. I-beam anchors are designed to distribute loads evenly and prevent damage to the beam, ensuring both safety and efficiency in various industries, including construction, manufacturing, and maintenance.
I-beam anchors are designed to securely grip I-beams and structural steel members, creating reliable anchor points for rigging equipment, safety systems, or personnel. These anchors can be used in both horizontal and vertical configurations, making them suitable for a wide range of applications, including lifting, fall protection, and maintenance work.
I-beam anchors are equipped with wheels or rollers that help distribute the load evenly along the length of the beam, preventing concentrated stress points.
Types of I-beam anchors include:
- Beam Clamps: Beam clamps are designed to attach to the bottom flange of an I-beam or beam. They typically have a threaded bolt or clamp mechanism that secures the clamp in place. Beam clamps are ideal for suspending loads, hoisting equipment, or providing anchor points for fall protection systems.
- Beam Trolleys: Beam trolleys, or I-beam trolleys, feature wheels or rollers that allow them to move along the length of the I-beam. This mobility makes them suitable for applications that require lateral movement of loads or personnel, such as positioning personnel for maintenance work.
Adjustable I-Beam Anchors: Some I-beam anchors are adjustable to accommodate a range of beam sizes and profiles. They often feature a threaded rod or bolt that can be tightened to secure the anchor to the beam.
Peace on your Days
Lance