Anchor Selection in Rope Rescue
Anchor selection is one of the most critical elements in rope rescue. It’s also one of the most nuanced. Choosing the right anchor is not just a matter of strength—it’s about judgment, environment, time constraints, and purpose.
Most anchors are never truly tested under full operational load. If they were, many would fail. That’s why solid anchor selection relies on experience, training, and an honest evaluation of your operating conditions.
There are three primary considerations every rescuer should assess when selecting an anchor point:
1. Location
Where is the victim? Where does the load need to go?
-
Determine the most efficient fall line
-
Avoid rappelling directly onto the patient unless it’s a pickoff
-
Consider route terrain: avoid loose rock, exposure zones, or fall hazards
-
Choose a descent line that allows packaging at rest and efficient retrieval
2. Strength
What forces will the system encounter?
-
Estimate the maximum expected load
-
Identify critical points where shock loading or vector changes may occur
-
Ensure the anchor setup stays within safety factors for all anticipated forces
3. Time
How much time do you have, and what’s the urgency?
-
Rescue scenarios may not allow for the perfect anchor
-
Sometimes “good enough” is what’s required to meet time constraints safely
-
This is where training and experience make the difference—knowing what will hold, and what won’t
Defining “Selection”
Selection means carefully choosing what’s most suitable—not what’s perfect. In real rescue work, “suitable” often depends on dynamic conditions that don’t feel clean or ideal.
A suitable anchor accounts for:
-
Terrain
-
Load
-
Environment
-
Time
-
Operational need
Remember, not all anchors are created equal. What matters is that each anchor matches its purpose and holds.
Five Anchor Categories in Rope Rescue
These categories will be explored in detail throughout the course, but here’s a foundational overview:
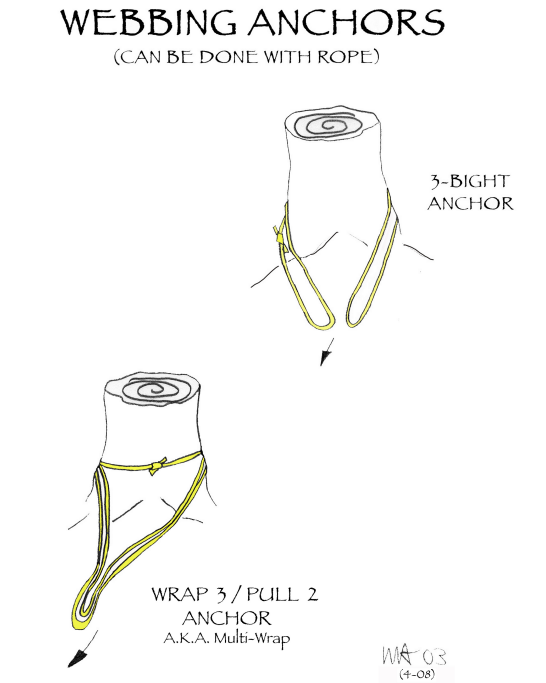
Working Line Anchors
-
Provide room to build haul systems
-
Positioned with space behind the edge for efficient rigging
-
Should align with the desired fall line
-
May require change-of-direction pulleys
Belay Anchors
-
Can be aligned near or with the main anchor
-
Should follow the same fall line for best load tracking
-
Must be secure, redundant, and placed with clarity of function
Bombproof Anchors
-
These do not require backups
-
For natural anchors: the feature is so massive that failure is nearly inconceivable
-
For structural anchors: failure of a single component would mean the whole structure fails (e.g., a welded beam or deep-rooted tree)
Questionable Anchors
-
May hold a vectored load but cannot be trusted solo
-
Must be backed up by independent secondary anchors
-
Often used in emergency or improvised scenarios
Marginal Anchors
-
Individually too weak, but combined in a shared-load configuration
-
All components work together for a single purpose
-
This is not redundancy—it’s required contribution from each element

Anchor Focal Point Planning
The focal point is where all rigging converges. Its location shapes the system layout, efficiency, and safety.
Key questions:
-
Should the focal point be raised to improve haul and belay access?
-
Do you need pre-tensioned back-ties or front-ties to control movement?
-
Is a floating focal point better suited for the terrain?
-
Will a change of direction allow better positioning further from the hazard zone?
During your size-up, mentally project where ropes will run. Pre-rig in your mind before you touch gear. This planning avoids system rework later and ensures you’re not setting up inside the hazard zone.
Modern Focal Point Strategy
While it was once common to stagger focal points away from the edge, current best practices favor side-by-side positioning of mainline and belay anchors.
Why?
-
Easier communication between rope operators
-
Better visual monitoring of both systems
-
Faster correction if one system drifts or fails
Situate focal points just far enough from the edge to allow system setup outside the hazard zone, especially for the haul team.
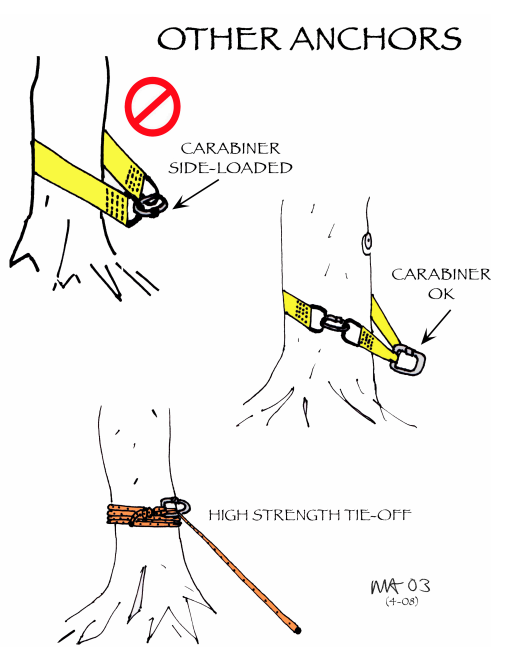
Other Anchor Considerations
-
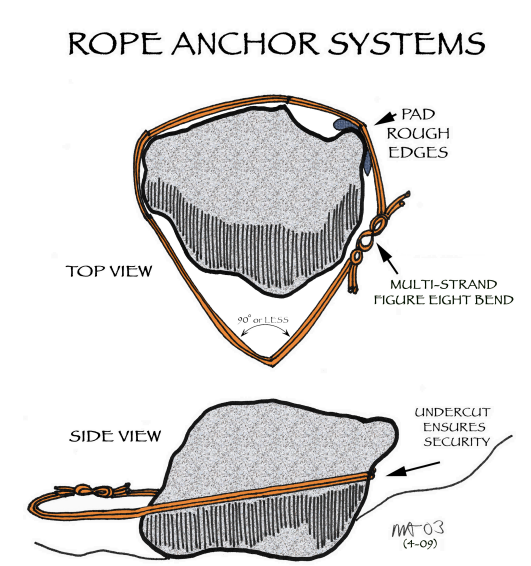
Pad all anchor points that have edges or corners
-
Avoid hot or chemically active surfaces
-
Use system-wide redundancy—do not rely on a single anchor
-
Attach at the base of the anchor feature to avoid leverage loading
-
Use multiple anchors if a single point’s reliability is uncertain
Using Directionals
-
Consider directionals to realign load paths
-
Artificial high directionals may be needed at the edge
-
Use terrain features like step-down ledges to improve edge transitions
-
A well-placed directional improves both safety and haul efficiency

Final Thought
Selecting an anchor is about more than force ratings. It’s about purpose, context, and informed decision-making. The anchors you choose—or don’t—become the foundation of every other choice in the system.
Plan wisely. Test mentally. Then build what you know will hold.
Peace on your Days
Lance