How to Perform a High-Angle Pick-Off Using the Petzl Jag and Double Long Tail Bowline
Keyphrase: high-angle pick-off with Petzl Jag
Meta Description: Learn how to execute a high-angle pick-off using the Petzl Jag system, a double long tail bowline, and two-point connection strategy. A complete breakdown of gear logic and safety flow.
Tags: high-angle rescue, pick-off, Petzl Jag system, double long tail bowline, rope rescue, load transfer, technical rope systems, victim access
A Real-World Rescue: Coordinated, Balanced, and Repeatable
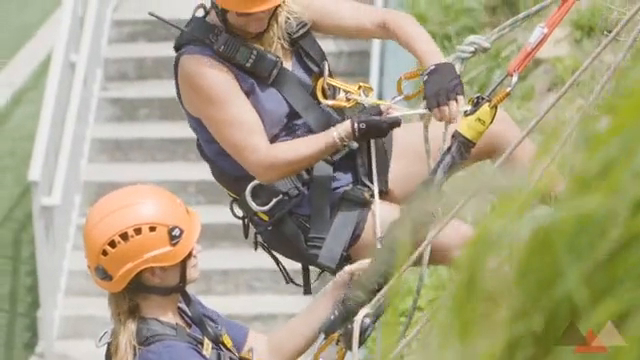
In high-angle environments, patient access is only the beginning. The more critical phase—the pick-off—demands deliberate structure, clean transitions, and flawless system integration. When performed under pressure, every knot and connection must behave predictably. One misstep could compromise both rescuer and victim.
The following operation illustrates a clean high-angle pick-off using a proven method. The rigging team combined three foundational tools:
-
The double long tail bowline for structured tie-in and tail management
-
The Petzl Jag System for efficient load transfer
-
A redundant two-point connection for safety during victim transition
This article breaks down each stage, explains the decision-making, and identifies best practices for similar field applications.
Step One: Establishing the Initial System
The pick-off began by tying a double long tail bowline, which created two distinct connection tails. This knot wasn’t selected at random. It offers load-rated strength, clear geometry, and enough tail length to create modular attachment points.
The rescuers approached the victim and used one of the long tails to attach to the victim’s secondary harness point. By using this secondary point, they preserved the victim’s original anchor while beginning to build a new one—an essential detail for clean transitions.
This setup keeps both parties secure without forcing a rapid disconnection. In complex terrain or limited visibility, that safety margin matters.
Step Two: Transferring the Load Using the Petzl Jag
With the initial connection secure, the next task was to unweight the victim’s original rope system. To do this safely, the team deployed the Petzl Jag System, a compact 4:1 mechanical advantage setup with built-in progress capture.
The Jag was connected via two Prusik cords, each tied just above the double long tail bowline. These served as:
-
Friction hitches for secure upward haul
-
Stable, load-rated connection points isolated from movement
Once the Jag was tensioned, it introduced slack into the victim’s original system, allowing it to be safely disconnected. At no point did the victim become unsupported—load transfer was continuous.
Step Three: Confirming Two Points of Connection
Before detaching the victim completely, the team paused to confirm two independent points of attachment. This principle—often called two is one, one is none—is a cornerstone of rope rescue logic.
With both the long tail and Jag system engaged, the team had full control and redundancy. No step was rushed. Only after verifying stability did they release the victim from their previous rig.
Step Four: Coordinated Descent
Once fully transitioned, the system moved into the final stage: controlled lowering.
The rescuer called for the “Down” command. Both individuals—rescuer and victim—descended together using the rigged lines. Friction and movement were managed smoothly from above, keeping the descent steady, aligned, and predictable.
Gear & Process Breakdown
To clarify the flow, here’s a component list of the full sequence:
✅ Tools Used:
-
Double long tail bowline – provided two clean attachment tails
-
Petzl Jag System – handled upward load transfer and progress capture
-
Two Prusik hitches – friction-based anchors for the Jag system
-
Two connection points – redundant attachment to the victim
-
Lowering system – facilitated final descent phase
🔧 Process Flow:
-
Approach victim and connect via long tail to secondary harness point
-
Tie Prusiks above main knot
-
Attach Jag to Prusiks and tension upward
-
Confirm slack in victim’s system, then disconnect
-
Verify two-point connection before descent
-
Call for lower and descend in control
Training Takeaways and Best Practices
This operation isn’t just a demo—it’s a masterclass in micro-decisions that create macro safety. For teams training in high-angle environments, several key lessons emerge:
-
Always tie in with intention. A long tail bowline provides flexibility and clarity under load.
-
Introduce the Petzl Jag only after the secondary connection is confirmed.
-
Place Prusiks above structural knots, not below. This avoids slippage and rope congestion.
-
Never transfer a load unless redundant connections are verified and team members agree on timing.
-
Use callouts like “Slack in!”, “Load transferred!”, and “Ready to lower!” to maintain sync.
Final Thoughts: Precision is Protection
A successful high-angle pick-off looks simple—but only because it’s been rehearsed, structured, and executed with discipline. The Petzl Jag adds elegance to load transfer, but it’s the system-thinking behind every connection that makes this method reliable.
This wasn’t just a rescue—it was a system in motion.
Peace on your Days
Lance