
Spinal Packaging for Vertical & Horizontal Use
The Sked stretcher is a vital tool in confined space rescue operations, offering flexibility for both vertical and horizontal patient transport. Its durable design and adaptable rigging options make it ideal for challenging environments. Below, we explore its use in spinal packaging, focusing on safety, efficiency, and patient care.
Vertical Rigging in Confined Spaces
Vertical packaging is essential for navigating tight spaces, allowing the patient to be safely transported through narrow or restricted areas.
Preparation and Patient Securing
- Spinal Precautions:
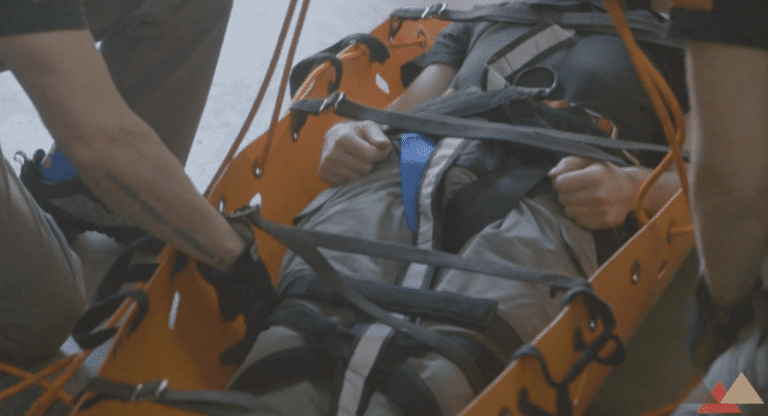
The patient is strapped to a spine board using spider straps and a hard collar to minimize movement and prevent further injury. The head and hands are secured to avoid contact with confined space hazards. - Padding and Protection:
Minimal padding is used due to space constraints. A helmet and eye protection shield the patient from potential impacts.
Sked Stretcher Setup
- Reverse Rolling:
To flatten the stretcher, unroll it, turn it over, and roll it backward. This ensures it lies flat, making placement easier. - Positioning:
Align the patient’s shoulders with the grommets at the stretcher’s head, centering them on the stretcher. Loosely secure the cross straps.
Vertical Lifting Bridle Installation
- Rigging:
Pass the lifting bridle through the grommets from head to foot, securing it to the spine board with a Munter hitch. Tighten all straps evenly. - Sliding Considerations:
The stretcher’s wedge shape ensures the patient is securely encapsulated as they naturally slide into position during the lift.

Horizontal Rigging for Patient Comfort
Horizontal transport is preferable when vertical positioning is no longer necessary, offering improved comfort during extended rescues.
Transitioning to Horizontal Setup
- Lifting Straps:
Without removing the patient, slide the head and foot straps under the stretcher. Use a tri-link to connect the straps securely. - Head-Up Positioning:
The shorter head strap creates a slightly elevated angle for comfort.
Final Checks
- Ensure all straps are tensioned evenly, with no interference from cross straps or vertical rigging. The tri-link serves as the primary connection point, while the Class II harness provides secondary security.

Key Benefits of the Sked Stretcher
- Versatility:
- Accommodates vertical and horizontal transport.
- Fits through narrow openings, ideal for confined spaces.
- Patient Safety:
- Secure spinal precautions minimize injury risk.
- Protective gear shields the patient from external hazards.
- Ease of Use:
- Durable plastic construction allows smooth sliding over rough surfaces.
- Compact design simplifies handling in tight environments.

Comprehensive Guide to Vertical & Horizontal Spinal Packaging
The Sked stretcher is a vital tool in confined space rescue, providing flexibility for vertical and horizontal patient transport. Its durable design and adaptability make it ideal for challenging environments, ensuring safety and efficiency during rescue operations. This comprehensive guide integrates detailed rigging techniques for both configurations to ensure optimal performance.
Vertical Rigging: Detailed Procedures
Vertical packaging is essential in confined spaces, enabling safe transport through narrow or restricted areas.
Preparation and Patient Securing
- Spinal Precautions:
Secure the patient to a spine board with spider straps and a hard collar. Ensure the head and hands are immobilized to prevent hazardous movement in confined spaces. - Protective Gear:
Equip the patient with a helmet and eye protection to shield against impacts and hazards.
Setting Up the Sked Stretcher
- Reverse Rolling:
Flatten the stretcher by unrolling it, turning it over, and rolling it backward. Perform this step outside the confined space if possible. - Positioning the Patient:
Align the patient’s shoulders with the grommets at the stretcher’s head. Ensure all straps are free and untangled.
Rigging the Vertical Lifting Bridle
- Initial Setup:
Feed the bridle ends through the stretcher handles and grommets, securing them with a Munter hitch at the spine board. Leave the bridle ends loose initially to adjust slack after tightening cross straps. - Securing Cross Straps:
Loosely secure the four cross straps across the patient’s torso to allow for lifting bridle adjustments. - Adjusting and Tightening:
Center the figure-eight knot between the head grommets and pull slack from the bridle evenly. Tighten the Munter hitch, ensuring the spine board is encapsulated within the stretcher. - Finishing Touches:
Secure the bridle with a square bend, adding overhand safeties on each side. Tuck strap ends inside the stretcher to avoid snags during transport. - Foot Straps:
Secure the foot straps to the lowermost cross strap, leaving room for patient sliding during vertical lifting.
Horizontal Rigging: Transition for Patient Comfort
While vertical transport is essential in confined spaces, horizontal positioning is more comfortable and beneficial for patient care during extended transport.
Converting to Horizontal Configuration
- Lifting Straps:
Slide the head and foot straps beneath the stretcher without removing the patient. Ensure equal strap length on both sides. - Attaching to Tri-Link:
Feed the straps through diagonal slots on the stretcher, routing them towards the middle. Secure all four straps to the tri-link, capturing one foot-end strap first, followed by both head-end straps, and then the remaining foot-end strap.
Securing and Adjusting
- Ensure the tri-link or alternate connectors (e.g., carabiners) are securely attached to the master rigging system.
- Maintain the head-up angle using the shorter head strap for patient comfort and stability.
Key Advantages of the Sked Stretcher
- Versatility:
Accommodates vertical and horizontal transport with easy configuration changes. - Safety Features:
Comprehensive spinal precautions, protective gear, and secure rigging reduce injury risk. - Compact Design:
Fits through narrow openings, ideal for confined spaces. - Durability:
High-quality materials withstand harsh conditions and protect patients from surface impacts.

Peace on your Days
Lance

Comments are closed.