Patient and Litter Packaging
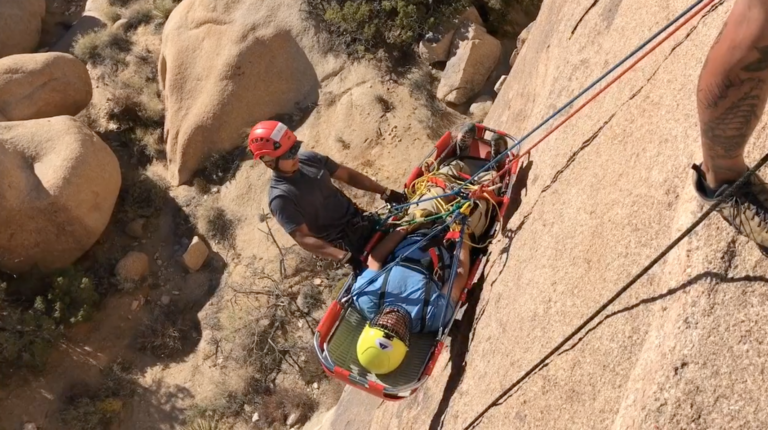
Patient and litter packaging is a cornerstone of technical rescue operations, ensuring the victim is secured safely, comfortably, and effectively for transport. Whether the rescue is conducted in a low-angle slope scenario or a high-angle vertical environment, the principles of patient care, system integrity, and operational efficiency must converge seamlessly.
In this unit, we delve into the nuances of preparing and packaging a patient for extraction. From initial stabilization to securing the patient in a litter, this guide emphasizes precision, teamwork, and adaptability.
The Essentials of Patient Packaging
Patient packaging begins the moment rescuers reach the victim. The goal is to stabilize and secure the individual in preparation for movement while maintaining their safety and comfort. Packaging is not merely about tying a patient into a litter; it’s about ensuring their condition doesn’t worsen during transport and addressing unique challenges presented by the terrain or situation.
Initial Assessment and Preparation
The process starts with a primary survey of the victim. This includes a quick evaluation of vital signs and injuries to determine the severity of the situation. If the patient’s condition allows, a secondary survey follows, incorporating a more detailed examination, including neurological checks.
To prepare the litter:
- Position the Inferno Traverse Rescue Stretcher on stable, debris-free ground.
- Secure the litter to an anchor point if operating near slopes or heights. This ensures it remains stationary as packaging begins.
- Add padding or a backboard to the litter to support injuries or increase comfort.
Communication is vital at this stage. Rescuers must ensure the patient understands what’s happening while coordinating tasks to avoid delays. For example, while some team members prepare the litter, others can apply the patient’s harness and head protection.
Securing the Patient: A Step-by-Step Process
Patient security is achieved through a combination of internal and external lashings, precise harness placement, and protective measures.
Harness Application
Before placing the patient in the litter, fit them with a class three harness. The harness serves as the main attachment point for subsequent lashings, ensuring the patient’s weight is supported during transport. Properly secure the harness, checking for any slack that could compromise its effectiveness.
Head and Eye Protection
The patient must be outfitted with a helmet to shield against falling debris or impacts during movement. For added protection, especially in dusty or sunny environments, safety goggles or sunglasses are applied. Adjust these to ensure a snug fit without discomfort.
Placing the Patient in the Litter
Position the patient close to the head end of the litter. This configuration is particularly useful for vertical extractions, as it minimizes shifting and ensures a smoother transition when the litter is tilted.
Lashings: The Backbone of Patient Packaging
Securing the patient involves two primary lashing techniques—internal lashings to prevent sliding and external lashings to protect extremities and stabilize the body.
Internal Lashings
The internal lashings are the first layer of security:
- Use 12-foot webbing to create the tie-ins.
- Girth hitch the webbing to the central attachment point on the patient’s harness.
- Interlace the webbing through the litter rails, ensuring it crosses evenly to distribute tension.
- Secure the webbing with a full round turn and two half hitches at the chest and shoulder area.
- Tuck excess webbing to avoid snagging during movement.
Internal lashings are particularly crucial in horizontal extractions, preventing the patient from sliding upward or downward during transitions.
External Lashings
Once the internal lashings are secured, external lashings are applied:
- Use Velcro spider straps or additional webbing to secure the patient’s extremities.
- Start at the chest and work downward, ensuring the straps are snug but not overly tight.
- Avoid wrapping straps around the litter’s top rail, as this can cause abrasion and compromise equipment integrity.
- Secure the feet and legs, paying special attention to injuries or pressure-sensitive areas.
These external lashings provide an additional layer of stability, especially in rough terrain or vertical extractions.
Adaptations for Terrain and Patient Needs
Every rescue presents unique challenges, from low-angle evacuations on rocky slopes to high-angle operations on vertical cliffs. Rescuers must adapt their techniques accordingly:
- Low-Angle Rescues: Stabilize the litter using a rope system and consider obstacles along the route. Maintain the patient’s head at a higher elevation than their feet to prevent discomfort or exacerbating injuries.
- High-Angle Rescues: Ensure the patient is securely tied into the litter before transitioning to a vertical orientation. Use a pelvic harness for additional stability and address potential suspension trauma if vertical positioning exceeds five minutes.
Final Checks and Preparations for Movement
Once the patient is packaged, conduct a final review to confirm all elements are secure:
- Double-check all lashings for proper tension and placement.
- Communicate with the patient to ensure they are comfortable and can breathe easily.
- Tuck away any loose straps or webbing to avoid entanglements during transport.
Simulate a vertical transition by carefully rolling the litter to identify any gaps or movement. This proactive step ensures the patient remains stable when the litter is lifted or lowered.
Case Application: The Spec Pak and Sked Stretcher
When operating in confined spaces or on vertical towers, specific tools like the Yates Spec Pak or Sked Stretcher enhance patient safety:
- Yates Spec Pak: Ideal for spinal packaging in vertical lifts, with a maximum capacity of 400 pounds. Its design delays suspension trauma onset and provides a versatile attachment system for both horizontal and vertical configurations.
- Sked Stretcher: A compact, durable option for confined spaces, capable of transitioning between vertical and horizontal setups. The stretcher’s plastic construction ensures easy movement over rough surfaces, and its lifting bridle system simplifies rigging.
Both devices emphasize the importance of tailored solutions based on the rescue environment and patient condition.
Takeaways for Effective Patient Packaging
- Communication is Key: Regular updates between team members and with the patient ensure efficiency and safety.
- Precision in Technique: Properly applied lashings and harnesses are non-negotiable for secure transport.
- Adaptability Matters: Each rescue is unique—adapt techniques to the terrain, equipment, and patient needs.
- Attention to Detail: Double-check all connections, secure loose ends, and maintain patient comfort at every step.
Patient and litter packaging is more than a technical procedure—it’s a critical step in ensuring the success of any rescue operation. By mastering these techniques, teams can confidently secure patients and navigate even the most challenging environments. Let me know if you’d like further refinements or additional details on specific equipment!
Top 3 Gear List for Patient and Litter Packaging
1. Yates Spec Pak
- Description: A robust and versatile class three harness designed for vertical and horizontal patient packaging, offering maximum safety and durability.
- Key Features:
- Vertical and horizontal lifting capabilities.
- Polyethylene backboard for sliding over obstacles.
- Color-coded buckles for low-light operations.
- Ideal Use: Confined space rescue, spinal precautions, high-angle operations.
2. Sked Stretcher
- Description: A compact, durable stretcher ideal for confined spaces and vertical rescues, featuring a plastic design for easy maneuverability.
- Key Features:
- Flexible design for horizontal and vertical use.
- Minimal diameter allows passage through narrow openings.
- Includes a lifting bridle for vertical transport.
- Ideal Use: Confined space extrication, high-angle and low-angle rescues.
3. Petzl ID Descender
- Description: A self-braking descender designed for smooth and controlled lowering in rescue operations.
- Key Features:
- Friction control for precise movement.
- Anti-panic function for added safety.
- Versatile use for lowering and belay systems.
- Ideal Use: Controlled descents, belay management in technical rescues.

